2 door VAE 306H

Let us all know what you are up to with your current restoration project. Get that Minor on the road!
Forum rules
By using this site, you agree to our rules. Please see: Terms of Use
jagnut66
Minor Legend
Posts: 3635
Joined: Fri Apr 11, 2008 7:28 pm
Location: Mansfield, Nottinghamshire.
MMOC Member: Yes

Re: 2 door VAE 306H

Post by jagnut66 »

Nice bit of engineering there! :D
Best wishes,
Mike.
1954 Series 2: 4 door: "Sally" -- Back on the ground with (slave) wheels and waiting to be resprayed......
1970 Triumph Herald 1200: "Hetty" -- Driven back from Llangollen in Wales (twice.....)
kevin s
Minor Legend
Posts: 1377
Joined: Tue Mar 26, 2013 8:20 pm
Location: Chelmsford, essex
MMOC Member: No

Re: 2 door VAE 306H

Post by kevin s »

Yes I am pretty pleased with the way it has come together, I wanted something a bit more substantial than the kits available.

I re-built the calipers last night, despite appearances they were in very good condition, new seals, new anti rattlle guides, new bleed nipples and all the rubber parts replaced, so ready for final assembly now but that may be a week or 2 yet due to other commitments.

Totaled up what the disc conversion cost today.

Discs £25
Calipers £25
Caliper rebuild parts £30
Steel plates £20
Pads £18
Wheel spacers £20
Nuts bolts etc £10
hoses £20

So a total of £168 plus my time for the machining for a completely new / rebuilt system, pretty happy with this.
Mulli
Minor Friendly
Posts: 54
Joined: Sat Dec 28, 2013 9:53 pm
Location: Birmingham
MMOC Member: Yes

Re: 2 door VAE 306H

Post by Mulli »

Great work love the colours, well done
kevin s
Minor Legend
Posts: 1377
Joined: Tue Mar 26, 2013 8:20 pm
Location: Chelmsford, essex
MMOC Member: No

Re: 2 door VAE 306H

Post by kevin s »

thanks,

Drivers side front brake is now completed, moved caliper to front which allowed me to use the standard Corsa brake hose. brake lines are also in and 13" rostyle wheel fits OK, hopefully I will get the time to turn it round and do the other side tomorrow, then we will have working brakes. Also rebuilt the heater and ordered parts to enable wipers to be re-fitted.

rps20170417_205222.jpg
rps20170417_205222.jpg (59.74 KiB) Viewed 4712 times
kevin s
Minor Legend
Posts: 1377
Joined: Tue Mar 26, 2013 8:20 pm
Location: Chelmsford, essex
MMOC Member: No

Re: 2 door VAE 306H

Post by kevin s »

some further progress, wipers re-built with one new tube (it had been kinked) and a wheelbox which was loose, new gasket for scuttle cut out of an old inner tube and all assembled with a good dose of waxoyl.

the wiring in the engine compartment has all been wrapped with cloth tape and p clips used to secure it, the brake lines have been fitted and secured by the same method.

Inside the instrument and switches are back in and the heater has been re-built and is ready to go back in. Next up is to cut out a parcel shelf, fit it and then work out how to mount the additional fuse boxes and relays.
rps20170506_204913.jpg
rps20170506_204913.jpg (35.41 KiB) Viewed 4697 times
rps20170506_204733.jpg
rps20170506_204733.jpg (65.46 KiB) Viewed 4697 times
kevin s
Minor Legend
Posts: 1377
Joined: Tue Mar 26, 2013 8:20 pm
Location: Chelmsford, essex
MMOC Member: No

Re: 2 door VAE 306H

Post by kevin s »

Further progress, made bracket for fuse boxes and relays, cut new parcel shelf and kick panels out of 4mm ply and covered in vinyl. most of the wiring and electrical components are now fitted, just a few odds and ends to do and the battery can be fitted and it all tested.

after this it will be headlining and glass.
Attachments
rps20170603_212648.jpg
rps20170603_212648.jpg (77.09 KiB) Viewed 4675 times
rps20170603_212623.jpg
rps20170603_212623.jpg (59.67 KiB) Viewed 4675 times
rps20170610_195757.jpg
rps20170610_195757.jpg (57.52 KiB) Viewed 4675 times
rps20170610_195706.jpg
rps20170610_195706.jpg (49.13 KiB) Viewed 4675 times
kevin s
Minor Legend
Posts: 1377
Joined: Tue Mar 26, 2013 8:20 pm
Location: Chelmsford, essex
MMOC Member: No

Re: 2 door VAE 306H

Post by kevin s »

Been spending the last week or so on the wiring, everything except the front lights (and engine circuits) is now fitted and working, had a few problems,
-washer pump connections wrong way round,
-missed lower connection on horn and pushed both on what turns out is the same connection (proves fusing works!)
-missed the earth wire off the heater
-Indicators don't flash, not sure if it is because the fronts are missing or relay is kaput but easy enough to fix later.

Attached is the new wiring diagram in case it is of interest to anyone, Tacho, temperature gauge, centre rear stop lamp and brake fluid level warning light will be added later but wiring is there anyway. I have also laid a spare cable to the rear in case we decide we want fog or reversing lights and at some point we will need to think about a 12V power feed and radio, but there are plenty of spare fuses to feed these from when we get round to it, current plan is to get it on the road and worry about these non essential items afterwards.

The original temperature warning light may also have to go to get a sensor for the gauge in unless anyone has come up with a better idea.

Capture wiring.jpg
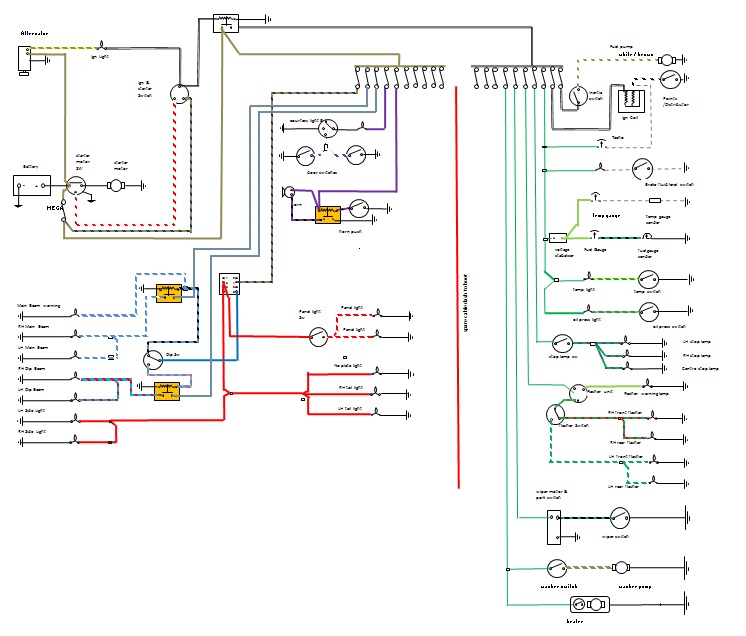
Capture wiring.jpg (110.79 KiB) Viewed 4656 times
firedrake1942
Minor Legend
Posts: 2945
Joined: Tue Aug 25, 2015 6:07 pm
MMOC Member: No

Re: 2 door VAE 306H

Post by firedrake1942 »

Wow, That is impressive, I have enough trouble changing a bulb!
kevin s
Minor Legend
Posts: 1377
Joined: Tue Mar 26, 2013 8:20 pm
Location: Chelmsford, essex
MMOC Member: No

Re: 2 door VAE 306H

Post by kevin s »

Checked out the last of the electrics today, mostly ok but fuel gauge has had it, took it out and clearly someone has tried to repair it before, need to find another one now.
jagnut66
Minor Legend
Posts: 3635
Joined: Fri Apr 11, 2008 7:28 pm
Location: Mansfield, Nottinghamshire.
MMOC Member: Yes

Re: 2 door VAE 306H

Post by jagnut66 »

Hi,
The indicators will not flash if one of the bulbs has blown on the side you are trying.
So if you don't have your front indicators installed at present the back ones won't flash (therefore they should once the fronts are fitted -- unless you have a dodgy flasher can! :wink: )
Best wishes,
Mike.
1954 Series 2: 4 door: "Sally" -- Back on the ground with (slave) wheels and waiting to be resprayed......
1970 Triumph Herald 1200: "Hetty" -- Driven back from Llangollen in Wales (twice.....)
kevin s
Minor Legend
Posts: 1377
Joined: Tue Mar 26, 2013 8:20 pm
Location: Chelmsford, essex
MMOC Member: No

Re: 2 door VAE 306H

Post by kevin s »

I did wonder some seem to go faster others don't flash on this one the unit rattled so I took the alloy can off and several bits of burnt contact fell out!

I assume that has had it then.......

Been some further progress

The headlining hoops have been shot blasted and painted, the roof mounted aerial found and trial fitted (need to paint some surface rust I missed inside the roof before it can be finally fitted) almost ready to fit the headlining now, just need to find or make some clips for the front header and stich some felt to the underside of the roof.

The steering wheel cracks were opened up, filled with milliput epoxy paste then sanded back and then painted, just a couple more coats and it will be done.

might even pull it out an turn it round at the weekend.
kevin s
Minor Legend
Posts: 1377
Joined: Tue Mar 26, 2013 8:20 pm
Location: Chelmsford, essex
MMOC Member: No

Re: 2 door VAE 306H

Post by kevin s »

steering wheel with cracks filled an rubbed down,
rps20170619_212324.jpg
rps20170619_212324.jpg (82.83 KiB) Viewed 4550 times
primed, painted and fitted to the car.
rps20170623_093433.jpg
rps20170623_093433.jpg (57.05 KiB) Viewed 4550 times
Also blasted and painted the rusty headlining hoops, found the clips for the front board so I have everything to fit this now.
rps20170623_093548.jpg
rps20170623_093548.jpg (34.47 KiB) Viewed 4550 times
Also fitted an aerial to the hole which was already in the roof, the hole seemed to date back to the Bristol Omnibus days as it had green paint around it, power for the roof sign or a radio system aerial?

rps20170623_093512.jpg
rps20170623_093512.jpg (41.23 KiB) Viewed 4550 times
I have also turned it around so I can build up the passenger door, fit the lhs disc brakes and start on stripping the front wings and bonnet for paint.
kevin s
Minor Legend
Posts: 1377
Joined: Tue Mar 26, 2013 8:20 pm
Location: Chelmsford, essex
MMOC Member: No

Re: 2 door VAE 306H

Post by kevin s »

slow but steady progress, passenger side door is now all built up, just needs the trim board fitting now.
rps20170724_212114.jpg
rps20170724_212114.jpg (45.44 KiB) Viewed 4396 times
trail fit of all the front panels, all pretty good just a couple of holes to open up and they will fit fine.
rps20170724_211913.jpg
rps20170724_211913.jpg (62.97 KiB) Viewed 4396 times
left hand brakes fitted, and pipes routed (excuse the vacuum cleaner)
rps20170724_212036.jpg
rps20170724_212036.jpg (61.86 KiB) Viewed 4396 times
rps20170724_211952.jpg
rps20170724_211952.jpg (53.92 KiB) Viewed 4396 times
just need to finished stripping the wings, weld one small rust patch and get some paint on them. note the interesting paint job over the paper label!
rps20170724_212200.jpg
rps20170724_212200.jpg (26.02 KiB) Viewed 4396 times
kevin s
Minor Legend
Posts: 1377
Joined: Tue Mar 26, 2013 8:20 pm
Location: Chelmsford, essex
MMOC Member: No

Re: 2 door VAE 306H

Post by kevin s »

slow but steady progress,

firstly I have fitted the headlining, wanted to do this while it was still warm, all went pretty well there are a couple of small wrinkles but nothing too bad.
rps20170824_213312 - Copy.jpg
rps20170824_213312 - Copy.jpg (33.72 KiB) Viewed 4197 times
rps20170824_213345 - Copy.jpg
rps20170824_213345 - Copy.jpg (30.44 KiB) Viewed 4197 times
next up is the front panels, stripped all the paint off the wings welded up the small area of rust at the rear and the front seams.
rps20170824_213413 - Copy.jpg
rps20170824_213413 - Copy.jpg (44.59 KiB) Viewed 4197 times
rps20170824_213508 - Copy.jpg
rps20170824_213508 - Copy.jpg (49.03 KiB) Viewed 4197 times
gaps to the doors are pretty good but the fit to the bonnet is pretty poor, being tight at the front and about 15mm at the rear.
rps20170824_213617 - Copy.jpg
rps20170824_213617 - Copy.jpg (35.08 KiB) Viewed 4197 times
I looked at a few at the Tewin show last week, none are fantastic but this is worse. after lots of head scratching I think I know what is wrong, The bonnet brace which goes from side to side has been repaired at some time and it seems to pull the bonnet sides in towards the rear, over the weekend I will try cutting the welds off and seeing if I can pull it out to fit.

I also want to get the glass in as soon as possible while it is still warm and to keep dust and dirt out of the interior.
les
Minor Maniac
Posts: 8759
Joined: Tue Feb 12, 2002 12:00 am
Location: kent
MMOC Member: Yes

Re: 2 door VAE 306H

Post by les »

I had a similar issue with the bonnet brace on pickup, I cut it in the centre and extended it with a piece of overlapping channel. Hope you're not keeping those wheels!!

kevin s
Minor Legend
Posts: 1377
Joined: Tue Mar 26, 2013 8:20 pm
Location: Chelmsford, essex
MMOC Member: No

Re: 2 door VAE 306H

Post by kevin s »

Wheels are a bit of a problem subject at the moment , after previous poor experiences with punctures in the land rover and lotus I am not happy with tubes in tubeless tyres, ultimately i think the best solution might be the modern van copies with tybeless rims, to get it on the road the rostyles may stay though.
jagnut66
Minor Legend
Posts: 3635
Joined: Fri Apr 11, 2008 7:28 pm
Location: Mansfield, Nottinghamshire.
MMOC Member: Yes

Re: 2 door VAE 306H

Post by jagnut66 »

Hi,
Before you spend loads on van wheels I just wanted to say I ran Abby on tubeless tyres fitted to standard wheels for years without issue, they just need to be in good condition (mine had been blasted clean, treated and repainted).
You are right though, tubes in tubeless tyres is a mistake, you'll get bad vibrations for a start and they do wear through the tubes in the end.
Best wishes,
Mike.
1954 Series 2: 4 door: "Sally" -- Back on the ground with (slave) wheels and waiting to be resprayed......
1970 Triumph Herald 1200: "Hetty" -- Driven back from Llangollen in Wales (twice.....)
kevin s
Minor Legend
Posts: 1377
Joined: Tue Mar 26, 2013 8:20 pm
Location: Chelmsford, essex
MMOC Member: No

Re: 2 door VAE 306H

Post by kevin s »

cutting off the bonnet brace and welding it 7mm wider made the gap between bonnet and wing much better,
rps20170829_135852.jpg
rps20170829_135852.jpg (21.93 KiB) Viewed 4110 times
rps20170829_135749.jpg
rps20170829_135749.jpg (30.32 KiB) Viewed 4110 times
also the front edge of the bonnet was cracking and very flexible so I added a bead of weld from behind, obviously still neeeds grinding back where it has penetrated through.
rps20170829_135717.jpg
rps20170829_135717.jpg (23.53 KiB) Viewed 4110 times
welds on seam also ground back ready for filling smooth.
rps20170829_135824.jpg
rps20170829_135824.jpg (39.1 KiB) Viewed 4110 times
rps20170829_135633.jpg
rps20170829_135633.jpg (39.19 KiB) Viewed 4110 times

next problem which can be seen in the photo's above is the front edge of the bonnet and the wing and therfore the front panel are not in the same position each side, after much head scratching it turns out the rh wing is 10mm longer than the left, I think I can sort this out by modifying the RH grille area to match the LH.

I have also put the front and rear screens in, front was easy, rear a nightmare and the seal tore in a couple of places, for now I will glue it eventually I would like a heated screen when funds allow so a new seal can wait till then.

I need to tidy the paint along the bottom edge before I can fit the rear side screens, when I painted it I thought the seal would cover more than it does and left a couple of grinder marks. The joy of using cellulose is that this is pretty easy to fill and touch in..
jaekl
Minor Addict
Posts: 612
Joined: Thu Jun 19, 2008 7:40 pm
Location: Pennsylvania, USA
MMOC Member: No

Re: 2 door VAE 306H

Post by jaekl »

The tears in the front of the bonnet are very common. The flange is very narrow. I tack in a 3/16 or so metal rod that extends into the full flange area to re-enforce it.
kevin s
Minor Legend
Posts: 1377
Joined: Tue Mar 26, 2013 8:20 pm
Location: Chelmsford, essex
MMOC Member: No

Re: 2 door VAE 306H

Post by kevin s »

It's amazing how much the bead of weld has stiffened it up, it was flexing so much the paint was cracking off around the raised centre section. Tonight I moved the font panel up so it now aligns with the bonnet, and the wing also matches the bonnet shape better now it is sitting a bit lower, a couple more holes to drill and the wings can come off for paint prep.
Post Reply