Painting outside, sorry did I give that impression, no no stag, lined my garage with plastic sheet keeps the dust down and you can put a heater in to lower the humidity.
Split screen SUE
Forum rules
By using this site, you agree to our rules. Please see: Terms of Use
By using this site, you agree to our rules. Please see: Terms of Use
-
SUE482
- Minor Fan
- Posts: 291
- Joined: Mon Aug 09, 2010 11:20 pm
- Location: In the Middle
- MMOC Member: Yes
Re: Re assembly order
Hi mach2 thanks for the info I thought I had but hadn't, to late now all back together.
Painting outside, sorry did I give that impression, no no stag, lined my garage with plastic sheet keeps the dust down and you can put a heater in to lower the humidity.
Painting outside, sorry did I give that impression, no no stag, lined my garage with plastic sheet keeps the dust down and you can put a heater in to lower the humidity.
Should be ready for tea time.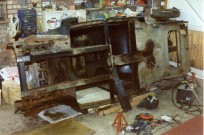
-
StaffsMoggie
- Minor Addict
- Posts: 541
- Joined: Tue Feb 26, 2008 5:41 pm
- Location: Rugeley, the fine town in Staffordshire.
- MMOC Member: No
Re: Re assembly order
Very nice, your photos are very helpful too.
-
chickenjohn
- Minor Legend
- Posts: 4064
- Joined: Tue Dec 07, 2004 8:50 am
- Location: Margate, East Kent
- MMOC Member: No
Re: Re assembly order
I agree, doors and front wings are the last panels to go on. Certainly easier and less likely to scratch anything by putting the bonnet on before the front wings.RobThomas wrote:Leave the doors and front wings off until all of the interior is done. Fewer scratches and more room to move about, escpecially in a single garage.
Having the engine in makes it easier to fit the front suspension. Having the axle on and the handbrake fitted makes it safer to work on. Brake/fual pipes and wiring prior to engine and box, so that you can get your hands down the tunnel and reach the clips etc. Leave the fuel tank until last.
BTW, much easier to attach the bonnet hinges to the bonnet first, then attach these hinges to the body.
Cheers John - all comments IMHO
- Come to this years Kent branches Hop rally! http://www.kenthop.co.uk
(check out the East Kent branch website http://www.ekmm.co.uk )


- Come to this years Kent branches Hop rally! http://www.kenthop.co.uk
(check out the East Kent branch website http://www.ekmm.co.uk )
-
SUE482
- Minor Fan
- Posts: 291
- Joined: Mon Aug 09, 2010 11:20 pm
- Location: In the Middle
- MMOC Member: Yes
Front Suspension
Thanks for all the comments and advice it is much appreciated.
Well the shell is complete, not as perfect as modern cars but then I dont suppose it never was even when new, now this is the bit I really enjoy.
Over the winter months I have been refurbishing various parts like the wipers, starter motor, petrol pump, rear axle, shocks and front axles etc. I get so carried away I forget to take photos so if anyone has anything in particular they wish to see PM me and I will see what I can do.
Here are the front axles fitted to the car.[frame] [/frame][frame]
 [/frame]
Completed[frame] [/frame]
Now for the back axle
Well the shell is complete, not as perfect as modern cars but then I dont suppose it never was even when new, now this is the bit I really enjoy.
Over the winter months I have been refurbishing various parts like the wipers, starter motor, petrol pump, rear axle, shocks and front axles etc. I get so carried away I forget to take photos so if anyone has anything in particular they wish to see PM me and I will see what I can do.
Here are the front axles fitted to the car.[frame]
Completed[frame]
Now for the back axle
Last edited by SUE482 on Fri Aug 31, 2012 10:06 am, edited 2 times in total.
Should be ready for tea time.
-
SUE482
- Minor Fan
- Posts: 291
- Joined: Mon Aug 09, 2010 11:20 pm
- Location: In the Middle
- MMOC Member: Yes
Rear Suspension
Well having previously refurbished the rear axle, shock absorbers and all the metal bits that make up the rear suspension now was the time to start on the rear suspension, the main components of the rear spring assembly all cleaned and hammerited. New rubbers of course, I try and use all the original bits as far as possible, or practicable and I had all the new parts so everything was going to be straight forward 
[frame] [/frame]
First I installed the front shackle plate to the spring hanger, here was the first problem, on the hanger I had replaced I had to file out the hole to allow the plate to fit properly. Hell of a job from underneath the car.
Interestingly the old existing one was a perfect fit. Moral here is if you are replacing the hanger first try the shackle plate to the hanger before fitting, much easier to rectify tolerance errors on the bench.
[frame] [/frame]
I then fitted the spring with the 4 (red) bushes. I used silicon spray for all the shackle pin assemblies, and eased the front of the spring into the hanger and slid in the new shackle pin. Copper grease is used on all nuts so that when I replace bushes etc. in 50 years time I will be able to it in half the time
[frame] [/frame]
I moved the axle into place and completed the assembly each side.
[frame] [/frame]
[frame] [/frame]
Completing the back shackle was the final bit which I did by using a trolley jack to lift the axle up.
[frame] [/frame]
Completed, pleased as punch.
[frame]
First I installed the front shackle plate to the spring hanger, here was the first problem, on the hanger I had replaced I had to file out the hole to allow the plate to fit properly. Hell of a job from underneath the car.
Interestingly the old existing one was a perfect fit. Moral here is if you are replacing the hanger first try the shackle plate to the hanger before fitting, much easier to rectify tolerance errors on the bench.
[frame]
I then fitted the spring with the 4 (red) bushes. I used silicon spray for all the shackle pin assemblies, and eased the front of the spring into the hanger and slid in the new shackle pin. Copper grease is used on all nuts so that when I replace bushes etc. in 50 years time I will be able to it in half the time
[frame]
I moved the axle into place and completed the assembly each side.
[frame]
[frame]
Completing the back shackle was the final bit which I did by using a trolley jack to lift the axle up.
[frame]
Completed, pleased as punch.
Should be ready for tea time.
-
SUE482
- Minor Fan
- Posts: 291
- Joined: Mon Aug 09, 2010 11:20 pm
- Location: In the Middle
- MMOC Member: Yes
Handbrake
Before fitting the wheels I decided to fit the handbrake cables, bleed the brakes and put oil in the axle, a lot easier when its on jacks.[frame] [/frame]
Here she is on her wheels after 3 decades.[frame] [/frame]Now for the headlining
Here she is on her wheels after 3 decades.[frame]
Last edited by SUE482 on Fri Aug 31, 2012 10:03 am, edited 2 times in total.
Should be ready for tea time.
-
DAVIDMCCULLOUGH
- Minor Legend
- Posts: 3010
- Joined: Sun Sep 09, 2007 10:42 pm
- Location: Whiteabbey, Co Antrim
- MMOC Member: Yes
Re: Split screen SUE
Great progress, make sure it doesnt take another 30 years to finish it completely 
Too many Minors so little time.....
-
SUE482
- Minor Fan
- Posts: 291
- Joined: Mon Aug 09, 2010 11:20 pm
- Location: In the Middle
- MMOC Member: Yes
Headlining Update
Well the headlining is in, with help from SUE, first assembled and secured the 4 metal supports as per instructions on the kitchen table and stapled and glued the headlining board. Two of us slid the the supports in from the rear until we reached the front. Pushed the board in so the two clips fastened under the front rail secured the cable at the two front corners and pulled the whole lot back quite tight. Fitted a heater inside the car and left on for an hour. Came back and tightened the cables and hey not a bad job, not perfect a couple of very small creases but OK.
[frame] [/frame]
As you can see I have started to put the interior in, the rear window and sides didn’t pose too much of a problem which is more than I can say for the front. Its not in yet.
[frame]
As you can see I have started to put the interior in, the rear window and sides didn’t pose too much of a problem which is more than I can say for the front. Its not in yet.
Should be ready for tea time.
-
SUE482
- Minor Fan
- Posts: 291
- Joined: Mon Aug 09, 2010 11:20 pm
- Location: In the Middle
- MMOC Member: Yes
Steering wheel, Handbrake and Windscreen
Well holidays etc. over time to start work again, rubbed down the steering wheel and handbrake and resprayed them gold.[frame] [/frame][frame]
 [/frame]
Now for the windscreen, it is finally in, took 3 of us, 2 in the car pushing the glass and me pulling the string and many thanks to to those who pointed me in the right direction. Not a very good fit so I put sealant in the grove where the glass fits, assembled it on the bench with a dummy centre pillar and held it in place from inside the car while I pulled the cord to get the seal over the bodywork. More sealant all around the the seal and body, and then pushed each side of glass outwards with a wooden post from inside the car. Left it for several days for the sealant to harden and then took the posts out.
Fitted the finisher and replaced the dummy pillar with the new one, again with plenty of sealant on the outside.
The steering wheel and wipers were then fitted.
Not bad but what a job.
[frame] [/frame]
Doors I think next.
Now for the windscreen, it is finally in, took 3 of us, 2 in the car pushing the glass and me pulling the string and many thanks to to those who pointed me in the right direction. Not a very good fit so I put sealant in the grove where the glass fits, assembled it on the bench with a dummy centre pillar and held it in place from inside the car while I pulled the cord to get the seal over the bodywork. More sealant all around the the seal and body, and then pushed each side of glass outwards with a wooden post from inside the car. Left it for several days for the sealant to harden and then took the posts out.
Fitted the finisher and replaced the dummy pillar with the new one, again with plenty of sealant on the outside.
The steering wheel and wipers were then fitted.
Not bad but what a job.
[frame]
Doors I think next.
Should be ready for tea time.
-
ASL642
- Minor Maniac
- Posts: 5200
- Joined: Sat Oct 20, 2007 3:14 pm
- Location: Warwickshire
- MMOC Member: No
Re: Split screen SUE
Looking good! I agree in fact I think fitting a splitscreen is one of the worst - could even beat scraping off old underseal!
Lou Rocke
MMOC 43512
-
Daddybear1984
- Minor Fan
- Posts: 177
- Joined: Thu Aug 16, 2012 7:47 pm
- Location: Doncaster,UK
- MMOC Member: No
Re: Split screen SUE
Really nice work and it's great to see such time and effort in to making a top job of it 
When you're in up over your head, the first thing to do is close your mouth.
-
SUE482
- Minor Fan
- Posts: 291
- Joined: Mon Aug 09, 2010 11:20 pm
- Location: In the Middle
- MMOC Member: Yes
Re: Split screen SUE
ASL scraping old underseal on your back with water running down your leg is a much nicer job, still its all done for now 
Should be ready for tea time.
-
SUE482
- Minor Fan
- Posts: 291
- Joined: Mon Aug 09, 2010 11:20 pm
- Location: In the Middle
- MMOC Member: Yes
Door Assembly and Fitting
Oh before I go on to the doors it is a lot easier to fit the offside bonnet hinge before you install the wiper motor (split screens only)
I decided to prepare and spray the doors separately, so I primed, filled flattened (see ealier posts) and glossed before fitting to the vehicle. Here are the doors with the bottom seals assembled.
[frame] [/frame]
The original frame was painted but I opted for second hand stainless from Bull, I put the pre assembled frame with all new channel rubbers, screws and quarter lights.
[frame] [/frame]
Fitted the door to the car, lots of readjustment but fits and lines up reasonably, not perfect but I cant remember how good the original was.
[frame] [/frame]
I found out by mistake that there was a definitive assembly procedure, I think it was winding mechanism first followed by frame and glass, locate the winding assembly arm in the channel regulator and secure the winder with the 4 screws. Put in the lock and escutcheon and secure with 3 screw for the lock and spring clip for the escutcheon. (Incidentally I had great difficulty in securing the escutcheon I purchased from ESM, there is barely enough pin length to hold the spring clip as the end bit is tapered. Were the early door made of thicker material than the later I wonder either way I must tell ESM about the problem.)
[frame] [/frame]
Secure the frame from the outside edge and inside the door, fit the window resting block and opening bar with new felt to minimise rattles.
[frame] [/frame]
On the Series II saloon the lock, handle plate and bar are all separate so connect the handle plate and bar with washer and split pin and insert into the door from the inside edge of the door and connect to the lock assembly as shown above. Finally fit the inner and outer weather strips, I found a paint scraper wonderful to push in the clips.
Finished item.
[frame] [/frame]
I decided to prepare and spray the doors separately, so I primed, filled flattened (see ealier posts) and glossed before fitting to the vehicle. Here are the doors with the bottom seals assembled.
[frame]
The original frame was painted but I opted for second hand stainless from Bull, I put the pre assembled frame with all new channel rubbers, screws and quarter lights.
[frame]
Fitted the door to the car, lots of readjustment but fits and lines up reasonably, not perfect but I cant remember how good the original was.
[frame]
I found out by mistake that there was a definitive assembly procedure, I think it was winding mechanism first followed by frame and glass, locate the winding assembly arm in the channel regulator and secure the winder with the 4 screws. Put in the lock and escutcheon and secure with 3 screw for the lock and spring clip for the escutcheon. (Incidentally I had great difficulty in securing the escutcheon I purchased from ESM, there is barely enough pin length to hold the spring clip as the end bit is tapered. Were the early door made of thicker material than the later I wonder either way I must tell ESM about the problem.)
[frame]
Secure the frame from the outside edge and inside the door, fit the window resting block and opening bar with new felt to minimise rattles.
[frame]
On the Series II saloon the lock, handle plate and bar are all separate so connect the handle plate and bar with washer and split pin and insert into the door from the inside edge of the door and connect to the lock assembly as shown above. Finally fit the inner and outer weather strips, I found a paint scraper wonderful to push in the clips.
Finished item.
[frame]
Should be ready for tea time.
-
MarkyB
- Minor Maniac
- Posts: 7845
- Joined: Thu Jan 25, 2007 3:18 pm
- Location: South East London
- MMOC Member: No
Re: Split screen SUE
I wouldn't stress too much about panel gaps, they didn't in the factory
"Once you break something you will see how it was put together"
-
SUE482
- Minor Fan
- Posts: 291
- Joined: Mon Aug 09, 2010 11:20 pm
- Location: In the Middle
- MMOC Member: Yes
Re: Split screen SUE
Yes MarkyB you are probably right, I suppose we have become too indocrinated with modern car syndrome and the quest for perfection. Unfortunately its difficult to get out of it. 
Should be ready for tea time.
-
jvickholm
- Minor Friendly
- Posts: 59
- Joined: Sun Aug 07, 2011 2:24 pm
- Location: Finland
- MMOC Member: No
Re: Split screen SUE
Quite right, these cars have their own imperfections and gaps, and in my opinion, that gives them their "soul".SUE482 wrote:Yes MarkyB you are probably right, I suppose we have become too indocrinated with modern car syndrome and the quest for perfection. Unfortunately its difficult to get out of it.
In Finland, our museum car-registration guide says that "the vehicle must not be better than the original". For example, all the components to be installed in the car has to be parts that that have been available when the car was originally manufactured. If the original car have some gaps, also the restored car can/must have those. Otherwise, the car does not meet the requirements set out in the museum car and it is not exempt from vehicle tax.
I hope you understand what I mean because English is not my native language I have to use a dictionary and translator..
If you wanna run cool, you got run on heavy, heavy fuel..
-
MarkyB
- Minor Maniac
- Posts: 7845
- Joined: Thu Jan 25, 2007 3:18 pm
- Location: South East London
- MMOC Member: No
Re: Split screen SUE
Well said, I like that philosophy a lot.
The truth is that these cars weren't lovingly hand built by craftsmen but whacked together on an assembly line in the Midlands, I think that's part of their charm.
The truth is that these cars weren't lovingly hand built by craftsmen but whacked together on an assembly line in the Midlands, I think that's part of their charm.
"Once you break something you will see how it was put together"
-
SUE482
- Minor Fan
- Posts: 291
- Joined: Mon Aug 09, 2010 11:20 pm
- Location: In the Middle
- MMOC Member: Yes
Re: Split screen SUE
Well thanks for the comments jvickholm, and your English is fine much better than my Finnish. That bit about not meeting requirements is interesting I don’t think that applies in the UK but I could be wrong, in any case there is no chance of this restoration being better than than the original I can assure.
Marky its interesting that this car was made in the Midlands, sold and registered in the Midlands and has spent all its life in the Midlands, lovingly by all 7 owners, according to the log book.
Marky its interesting that this car was made in the Midlands, sold and registered in the Midlands and has spent all its life in the Midlands, lovingly by all 7 owners, according to the log book.
Should be ready for tea time.
-
SUE482
- Minor Fan
- Posts: 291
- Joined: Mon Aug 09, 2010 11:20 pm
- Location: In the Middle
- MMOC Member: Yes
Door Trim
As I said earlier I wax oiled the inside of the doors, while I was at it I did the same to all the cavity sections and places where I had to replace which were rotten, and I mean everywhere. 
Next I decided to fit the draught excluder, mainly because I kept banging my head on the top. The excluder needs to be opened up in order to fit over the body lip and clips, I used 2 paint scrapers to do this, insert and gradually prise open, not to much or the excluder will be too loose on the clips.
The clips, lots of them. Here’s a couple and the excluder fitted.
[frame] [/frame][frame]
 [/frame][frame]
 [/frame]
I must make a point here, the excluder requires that it be cut to the correct length which is easy enough, however the stitching in my opinion is very poor, its not a dead stitch it runs if pulled, the ends require sowing with thread and then stuck with contact adhesive.
See here what I mean.
[frame] [/frame]
New door trim, fit the clips line them up and push. Fit fibre washer to window handle and secure both handles with nice shiny chrome plated screws and a new door pull, using the original chrome cover which is different to the later models.
Here is the door looking just like new.[frame] [/frame][frame]
 [/frame]
Next the rear quater panels, that should be a piece of cake.
Next I decided to fit the draught excluder, mainly because I kept banging my head on the top. The excluder needs to be opened up in order to fit over the body lip and clips, I used 2 paint scrapers to do this, insert and gradually prise open, not to much or the excluder will be too loose on the clips.
The clips, lots of them. Here’s a couple and the excluder fitted.
[frame]
I must make a point here, the excluder requires that it be cut to the correct length which is easy enough, however the stitching in my opinion is very poor, its not a dead stitch it runs if pulled, the ends require sowing with thread and then stuck with contact adhesive.
See here what I mean.
[frame]
New door trim, fit the clips line them up and push. Fit fibre washer to window handle and secure both handles with nice shiny chrome plated screws and a new door pull, using the original chrome cover which is different to the later models.
Here is the door looking just like new.[frame]
Next the rear quater panels, that should be a piece of cake.
Should be ready for tea time.