Split screen SUE
Forum rules
By using this site, you agree to our rules. Please see: Terms of Use
By using this site, you agree to our rules. Please see: Terms of Use
-
SUE482
- Minor Fan
- Posts: 291
- Joined: Mon Aug 09, 2010 11:20 pm
- Location: In the Middle
- MMOC Member: Yes
Split screen SUE
Hi I'm new to the site but I have had my 1955 Moggy for the 36 years, 15 of those all stripped down. I am now approaching finishing the shell welding ready for rust proofing, filling and priming. Can anyone point me in the right direction on the re-assembly order from the all bear basic shell, some will be self explanatory but I bet there are some pitfalls.
Should be ready for tea time.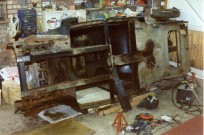
Re: Re assembly order
May not be 100% but my method would be.....
Front suspension
Rear Axle
Brake system
Wiring Harness
Doors, Wings, Bootlid, Bonnet, Front Panel, Bumpers (align doors to wings to bonnet to front panel to bumper etc)
Steering gear
Engine, Gearbox, Propshaft
Headliner
Glass
Carpets
Interior Trim Panels
Seats
What did I miss.....?
Front suspension
Rear Axle
Brake system
Wiring Harness
Doors, Wings, Bootlid, Bonnet, Front Panel, Bumpers (align doors to wings to bonnet to front panel to bumper etc)
Steering gear
Engine, Gearbox, Propshaft
Headliner
Glass
Carpets
Interior Trim Panels
Seats
What did I miss.....?
[sig]8426[/sig]
Compare the Minors - Simples !! http://mog.myfreeforum.org/index.php
Compare the Minors - Simples !! http://mog.myfreeforum.org/index.php
Re: Re assembly order
I agree as above. Put the fuel tank in before fitting the boot lid/rear doors. Definitely fit the doors and get good gaps in the frame, then fit the front winds and adjust to match the doors.
-
SUE482
- Minor Fan
- Posts: 291
- Joined: Mon Aug 09, 2010 11:20 pm
- Location: In the Middle
- MMOC Member: Yes
Re: Re assembly order
Hi thanks chaps for the advice, I will keep you updated on the progress.
Should be ready for tea time.
-
RobThomas
- Minor Legend
- Posts: 2646
- Joined: Thu May 11, 2006 10:34 am
- Location: Cardiff
- MMOC Member: Yes
Re: Re assembly order
Leave the doors and front wings off until all of the interior is done. Fewer scratches and more room to move about, escpecially in a single garage.
Having the engine in makes it easier to fit the front suspension. Having the axle on and the handbrake fitted makes it safer to work on. Brake/fual pipes and wiring prior to engine and box, so that you can get your hands down the tunnel and reach the clips etc. Leave the fuel tank until last.
Having the engine in makes it easier to fit the front suspension. Having the axle on and the handbrake fitted makes it safer to work on. Brake/fual pipes and wiring prior to engine and box, so that you can get your hands down the tunnel and reach the clips etc. Leave the fuel tank until last.
Cardiff, UK
-
SUE482
- Minor Fan
- Posts: 291
- Joined: Mon Aug 09, 2010 11:20 pm
- Location: In the Middle
- MMOC Member: Yes
Re: Re assembly order
This is what SUE482 looked like in 1990 after I had stripped her down  and started to replace the various box sections.[frame]
 [/frame]
Since then other restoration has taken priority, barn conversion, but I am now back on the job. This is the present state of progress[frame] [/frame][frame]
 [/frame] Soon be ready to put the floors in, cant wait to start rust proofing and painting the box sections.
Since then other restoration has taken priority, barn conversion, but I am now back on the job. This is the present state of progress[frame]
Should be ready for tea time.
-
Dryad
- Minor Addict
- Posts: 625
- Joined: Tue Jan 11, 2005 7:37 pm
- Location: South Norfolk
- MMOC Member: No
Re: Re assembly order
That's a very brave and yet methodical approach to restoration you have there! I would be worried about distortion of the body shell, without any bracing, but it all looks good and as long as there is sufficient strength in the boxing panels/sections, crossmember and front chassis legs then I can't see any problem with that. Presumably you have tried fitting the doors to see if they still shut? 
-
SUE482
- Minor Fan
- Posts: 291
- Joined: Mon Aug 09, 2010 11:20 pm
- Location: In the Middle
- MMOC Member: Yes
Re: Re assembly order
Hi thanks for all the advice, the doors, boot and bonnet fit OK with the exception of the drivers door which requires additional spacers for some reason, no big deal though! Here are a couple of pics as you can just see I made a trolley so that I could move the old car round.Now for spraying underneath with stone chip before putting in the fuel and break pipes and wiring harness. Then the bodywork.[frame] [/frame][frame]
 [/frame][frame]
 [/frame]
Should be ready for tea time.
-
Fingolfin
- Minor Legend
- Posts: 1312
- Joined: Thu Jan 28, 2010 4:14 am
- Location: Fulton, Missouri, United States
- MMOC Member: No
Re: Re assembly order
Very nice job! I really admire the thoroughness of your job. Where'd you get the floor panels? The circular depressions are different from my replacement pan!
Just as an aside -- I put in the steering rack first, then the front suspension, then the steering wheel, so I could ensure the wheel was centralized to the rack properly. But otherwise PSL's list is about what I would do -- with the possible exception of engine and gearbox, which I'd put in very last. It really depends on your personal preference! So long as it all gets together, it makes little difference.
Just as an aside -- I put in the steering rack first, then the front suspension, then the steering wheel, so I could ensure the wheel was centralized to the rack properly. But otherwise PSL's list is about what I would do -- with the possible exception of engine and gearbox, which I'd put in very last. It really depends on your personal preference! So long as it all gets together, it makes little difference.
The way to a man's heart may be making food, but the way to my heart is buying me car parts!
Come read about my Minor at An American Moggie.

Come read about my Minor at An American Moggie.
-
SUE482
- Minor Fan
- Posts: 291
- Joined: Mon Aug 09, 2010 11:20 pm
- Location: In the Middle
- MMOC Member: Yes
Re: Re assembly order
Hi glad you like it, here are some more photos after spraying with stone chip. Fuel pipe, wiring harness and torsion bars are now fitted due to the ease of access. If you need any photos showing anything just let me know. All my repair panels were obtained from Morris Minor Center, Birmingham in 1990 probably before you were born.  [frame]
 [/frame][frame]
 [/frame][frame]
 [/frame][frame]
 [/frame]
Should be ready for tea time.
-
SUE482
- Minor Fan
- Posts: 291
- Joined: Mon Aug 09, 2010 11:20 pm
- Location: In the Middle
- MMOC Member: Yes
Moggy Update
This is after rubbing down and first few coats of primer.
I can see all the work I've got in front of me now particulaly over the right hand rear arch. The new wing does not fit as it should. [frame]
 [/frame][frame]
 [/frame]
I can see all the work I've got in front of me now particulaly over the right hand rear arch. The new wing does not fit as it should.
Should be ready for tea time.
-
Jared
- Minor Friendly
- Posts: 58
- Joined: Sat Jun 12, 2010 4:39 pm
- Location: Staffordshire
- MMOC Member: No
Re: Re assembly order
Excellent work and that picture of the car without the floor is most helpfull, thanks.
-
SUE482
- Minor Fan
- Posts: 291
- Joined: Mon Aug 09, 2010 11:20 pm
- Location: In the Middle
- MMOC Member: Yes
Door Repairs
Rubbing, sanding will I ever get to the end 
Here a couple of pics of the doors after sandblasting[frame] [/frame][frame]
 [/frame][frame]
 [/frame]
And after welding in the repair panels, filling and sanding[frame] [/frame][frame]
 [/frame][frame]
 [/frame]
Now for priming
Here a couple of pics of the doors after sandblasting
And after welding in the repair panels, filling and sanding[frame]
Now for priming
Last edited by SUE482 on Fri Aug 31, 2012 10:09 am, edited 1 time in total.
Should be ready for tea time.
-
irmscher
- Minor Legend
- Posts: 3773
- Joined: Wed Jul 14, 2010 10:53 am
- Location: South Manchester
- MMOC Member: Yes
Re: Re assembly order
is it done yet ??
-
SUE482
- Minor Fan
- Posts: 291
- Joined: Mon Aug 09, 2010 11:20 pm
- Location: In the Middle
- MMOC Member: Yes
Rear Axle and Seering Rack
Hi irmscher sorry nearly.
Here is a few more pics while you wait. Not ready for the top coat yet, neither is the weather for that matter.
[frame] [/frame][frame]
 [/frame]
I spend most of the time trying to locate parts a little less expensive than those supplied from the usual commercial suppliers.
Here is a few more pics while you wait. Not ready for the top coat yet, neither is the weather for that matter.
[frame]
I spend most of the time trying to locate parts a little less expensive than those supplied from the usual commercial suppliers.
Last edited by SUE482 on Fri Aug 31, 2012 10:08 am, edited 1 time in total.
Should be ready for tea time.
-
SUE482
- Minor Fan
- Posts: 291
- Joined: Mon Aug 09, 2010 11:20 pm
- Location: In the Middle
- MMOC Member: Yes
Bodywork Update
Well at last the weather is on the turn, or at least it was last week, temp up in the 20's and humidity less the 50% OK for spraying a guide coat. Not as shiny as the one in background yet
[frame] [/frame][frame]
 [/frame][frame]
 [/frame]
After rubbing and flatting and the another top coat its looking OK. [frame]
 [/frame]
Doors, bonnet and boot lid ready for spraying[frame] [/frame]
I spoke to soon weather has taken a turn for the worse and Oh dear some bubbling up of the paint at the seams, someone has used water based paint at sometime I think. Rubbing down again and seal the offending bits. Mutter mutter 
[frame]
After rubbing and flatting and the another top coat its looking OK.
Doors, bonnet and boot lid ready for spraying[frame]
I spoke to soon weather has taken a turn for the worse and Oh dear
Last edited by SUE482 on Fri Aug 31, 2012 10:07 am, edited 1 time in total.
Should be ready for tea time.
-
SUE482
- Minor Fan
- Posts: 291
- Joined: Mon Aug 09, 2010 11:20 pm
- Location: In the Middle
- MMOC Member: Yes
Progress Update and Starter Motor
Well stripped it down to bare metal. Sealed all the joints and started again  now we are back where we started several weeks ago, had to wait for the weather to turn before applying the top coat. Here it is.
[frame] [/frame]
[frame] [/frame]
[frame] [/frame]
So now I can start to reassemble, a milestone has been reached. However I must say that after reading some of the comments on this site about replacing the headlining I can't wait to get started.
While I was waiting for the weather to change I started to refurbish various bits and pieces.
Here is the Starter Motor brush replacement.
After cleaning and removing the old brushes using a 240 watt soldering iron, you can just see the two eyelets which secured the brushes at 4 and 10 o'clock.
[frame] [/frame]
When replacing the brushes solder very sparingly as too much solder it will creep up the braiding, you can see its started on the right hand one in the picture and don’t forget to note which side of the eyelet to insert the new brush braiding.
[frame] [/frame]
Brushes on the coil side is a bit more fiddly, I found it easier to dissemble it rather that try in situ, the 4 coils securing screws will require an impact driver to loosen and lots of WD40 but once its out all can be cleaned a lot more thoroughly. I am afraid the photos are out of focus but you can see the construction of the field coil.
[frame] [/frame]
When replacing the brushes cut the old ones off at about 1/4" from the coil and resolder the new ones to this. It is much easier then removing the old ones from the coils, you can just see the solder joints, again note that these brushes have different lengths of braiding make sure you replace the same way.
[frame] [/frame]
Reassemble not forgetting to position the field winding insulation band in the correct position or else you may have a short to ground.
[frame]
[frame]
[frame]
So now I can start to reassemble, a milestone has been reached. However I must say that after reading some of the comments on this site about replacing the headlining I can't wait to get started.
While I was waiting for the weather to change I started to refurbish various bits and pieces.
Here is the Starter Motor brush replacement.
After cleaning and removing the old brushes using a 240 watt soldering iron, you can just see the two eyelets which secured the brushes at 4 and 10 o'clock.
[frame]
When replacing the brushes solder very sparingly as too much solder it will creep up the braiding, you can see its started on the right hand one in the picture and don’t forget to note which side of the eyelet to insert the new brush braiding.
[frame]
Brushes on the coil side is a bit more fiddly, I found it easier to dissemble it rather that try in situ, the 4 coils securing screws will require an impact driver to loosen and lots of WD40 but once its out all can be cleaned a lot more thoroughly. I am afraid the photos are out of focus but you can see the construction of the field coil.
[frame]
When replacing the brushes cut the old ones off at about 1/4" from the coil and resolder the new ones to this. It is much easier then removing the old ones from the coils, you can just see the solder joints, again note that these brushes have different lengths of braiding make sure you replace the same way.
[frame]
Reassemble not forgetting to position the field winding insulation band in the correct position or else you may have a short to ground.
Last edited by SUE482 on Fri Aug 31, 2012 10:02 am, edited 3 times in total.
Should be ready for tea time.
-
MarkyB
- Minor Maniac
- Posts: 7845
- Joined: Thu Jan 25, 2007 3:18 pm
- Location: South East London
- MMOC Member: No
Re: Re assembly order
Into what? It looks good to mewait for the weather to turn
"Once you break something you will see how it was put together"
Re: Re assembly order
the car looks amazing and the starter motor information is really useful. regarding the out of focus pictures try the macro setting on the camera, normally the symbol is like a little flower
if in doubt give it a clout!
-
stag36587
- Minor Legend
- Posts: 1395
- Joined: Sat Jan 06, 2007 3:55 pm
- Location: Raunds, Northamptonshire
- MMOC Member: No
Re: Re assembly order
Quick query - you painted outside? How smelly is that - I always worry abut upsetting neighbours
]