Page 7 of 12
Re: Edd's 1969 2 door. UHU62H
Posted: Thu Nov 13, 2014 4:11 pm
by laneychief
Just started restoring the drivers seat after hearing a clunk and sinking a few inches, I discovered not only have all the straps sagged or died, the frame itself has split, time for some welding....[frame]

[/frame]
Re: Edd's 1969 2 door. UHU62H
Posted: Thu Nov 13, 2014 4:15 pm
by laneychief
Also, to anyone actually reading this....
I'm going to get all my wheels blasted and coated, now I can't decide on the colour. If I should go for the Dark Silver like it says on the chart I've been reading or the old English cream, which is the popular choice, bearing in mind the car is going almond green.
Any advice on the matter would be hugely appreciated.
Edd
Re: Edd's 1969 2 door. UHU62H
Posted: Thu Nov 13, 2014 4:38 pm
by tysonn
Is the gramaphone an old one or a replica?Looks great!Bonnet ain't bad either ;-)
Re: Edd's 1969 2 door. UHU62H
Posted: Thu Nov 13, 2014 4:53 pm
by laneychief
eBay replica! Bought for the wedding! Pretty good though!
Re: Edd's 1969 2 door. UHU62H
Posted: Thu Nov 13, 2014 6:50 pm
by Neil MG
If you were going concours or all original then obviously silver, but in my opinion the almond green will look much better with cream...
Re: Edd's 1969 2 door. UHU62H
Posted: Thu Nov 13, 2014 6:54 pm
by kevin s
Impressive to get it roadworthty in time, as for the wheels it's down to your preferrance, after all, it's no great job to change the wheel colour later on if you change your mind.
Re: Edd's 1969 2 door. UHU62H
Posted: Thu Nov 13, 2014 7:03 pm
by jagnut66
I agree with cream and that the gramaphone looks excellent, do you have a link for it on eBay?
I'm pleased you found an even better bonnet to replace the autographed one, which I see you have now lacquered and is ready to hang.
Mine had some grey parts for some time................
[frame] [/frame]
................... and my seats needed the frames welding too, a common problem I'm led to believe, so you will get there.
I hope things continue well for you on all fronts.
Best wishes,
Mike.
PS: BMC -- the headlamp peaks are now gone, so no need to have me shot....... 
Re: Edd's 1969 2 door. UHU62H
Posted: Thu Nov 13, 2014 7:07 pm
by tysonn
Shame about the headlamp peaks.They're mint!!!!
Re: Edd's 1969 2 door. UHU62H
Posted: Thu Nov 13, 2014 7:18 pm
by laneychief
Cheers all!
Yeh I'm not going concours and I do really like the cream so I'll go that way!
Link for gramophone
http://m.ebay.co.uk/itm/271652985445?nav=SEARCH
Cheers again all! New seat foam, rubber diaphragm to replace seat straps and new back straps have arrived!
Bit of welding, smidge of hammerite then reassembly!
Re: Edd's 1969 2 door. UHU62H
Posted: Thu Nov 13, 2014 7:24 pm
by jagnut66
Shame about the headlamp peaks.They're mint!!!!
For my reason for removal see:
http://www.mmoc.org.uk/viewtopic.php?f=1&t=54517
They were given away free at the last National, so hopefully someones enjoying them.
Best wishes,
Mike.
Re: Edd's 1969 2 door. UHU62H
Posted: Wed Dec 03, 2014 9:49 am
by laneychief
Drivers seat restoration has progressed and has been done
First stage welding the break from the previous post[frame]

[/frame]
Then after that it's installing the new rubber base and hammeriting the frame[frame]

[/frame]
Then onto new back straps[frame]

[/frame]
You can see the new foam behind it, it's now put back together but getting the base upholstery to fit nicely with new foam was a swear word inducing task...[frame]

[/frame]
So that's ready to go back in.
I've just ordered a poly tunnel, to grow morris minors....as you can see from the top photo I have no garage, so the poly tunnel will become it! I'm then moving on to removing the doors and fixing the bottoms of the usual rot!
Thanks again all,
Edd
Re: Edd's 1969 2 door. UHU62H
Posted: Wed Dec 03, 2014 10:17 am
by panky
Nice job, love the tear-drop too

Re: Edd's 1969 2 door. UHU62H
Posted: Wed Dec 03, 2014 10:20 am
by laneychief
Cool huh! That needs some work doing, I'm hoping I can squeeze it in under the poly tunnel!
The plan is to have them both ready for the national so we can all come!
Re: Edd's 1969 2 door. UHU62H
Posted: Thu Dec 04, 2014 8:38 am
by Neil MG
Edd, you are an inspiration to us all!
To get it ready in time for the wedding was awesome work and given the circumstances and conditions I really take my hat off to you. Best of luck with the ongoing work and keep us all posted.
Re: Edd's 1969 2 door. UHU62H
Posted: Thu Dec 04, 2014 9:57 am
by laneychief
Thanks for the kind words.
My poly tunnel has arrived ready to go up in the next few days, I'm planning on getting it resprayed and interior done for the national next year!
Re: Edd's 1969 2 door. UHU62H
Posted: Sun Dec 07, 2014 7:51 pm
by laneychief
[frame]

[/frame]
Morris moved into his new house today.
First job is make a list of what needs doing and then it's door bottoms next!
Wish me luck, any advice on doing door bottoms appreciated.
Edd
Re: Edd's 1969 2 door. UHU62H
Posted: Sun Dec 07, 2014 8:10 pm
by gtt1951
That is exactly the same Polytunnel that I have. I've used special anchors (used for locking down pub outdoor furniture) to make sure it doesn't get blown away. I wish now that I had got a slightly longer one, as 2 moggies don't quite fit - I've had to leave the "door" flap unzipped and then clamped to the outer rear wings on the 2nd car, as a "flap". George.[frame]

[/frame]
Re: Edd's 1969 2 door. UHU62H
Posted: Sun Dec 07, 2014 8:12 pm
by laneychief
Ah brilliant!
Yeh I need to do some more wind protection!
Re: Edd's 1969 2 door. UHU62H
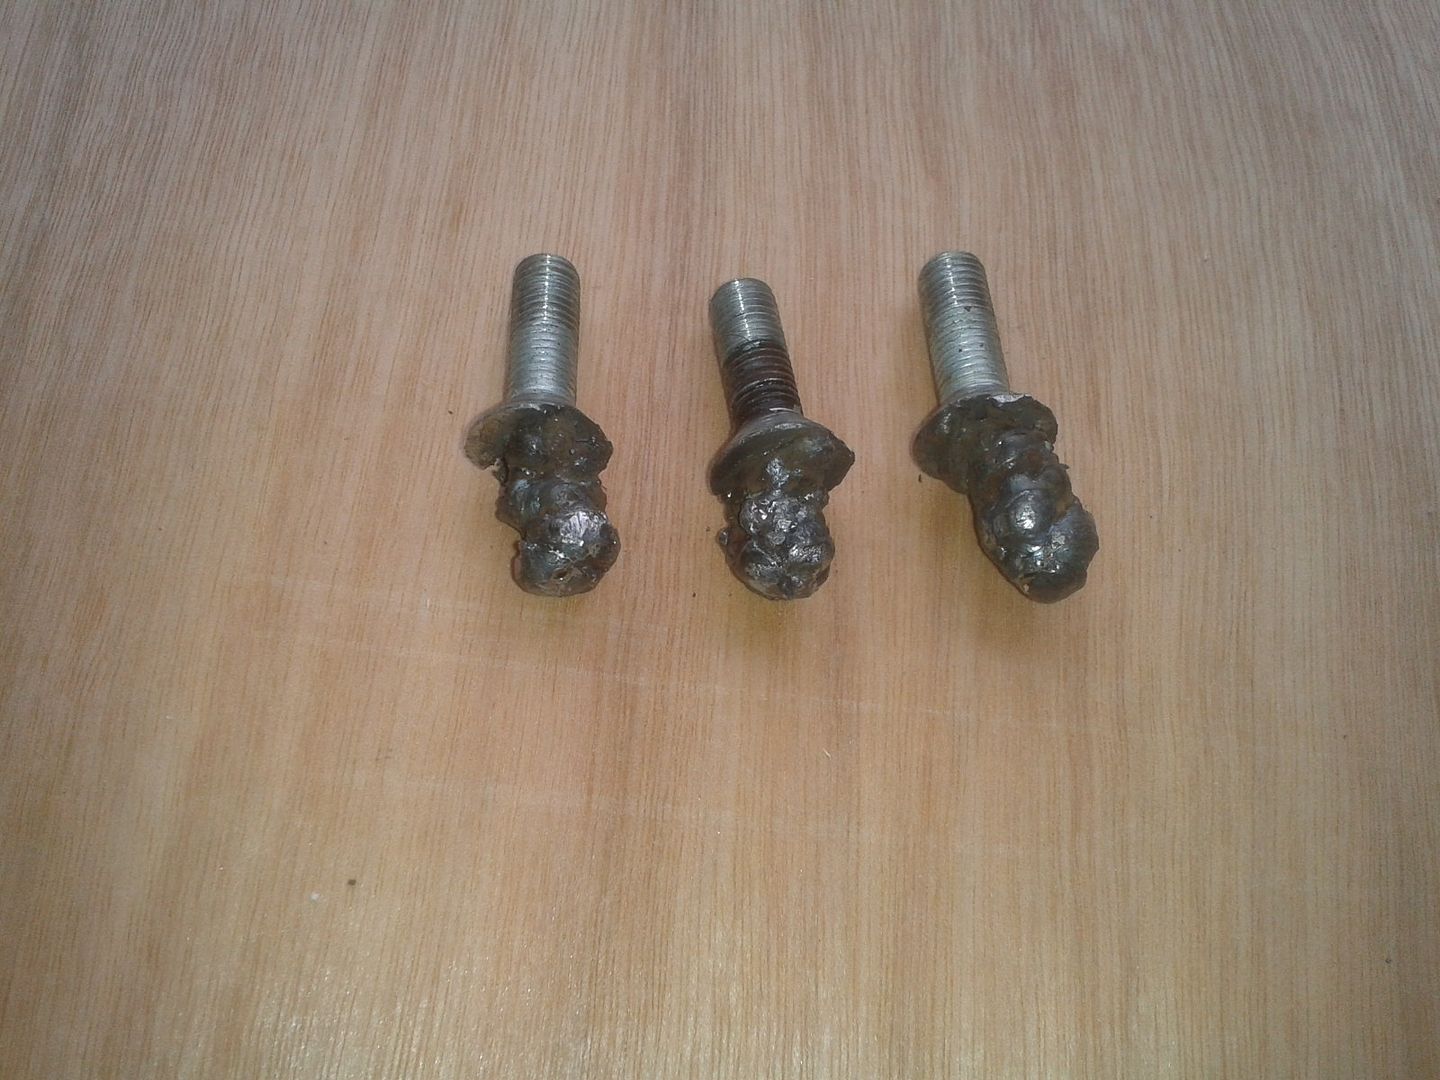
Posted: Mon Dec 08, 2014 2:26 pm
by laneychief
Started removing door hinges today...not that successful as the nuts on the top hinge are round!! Might have to drill them out with the reverse drill bit remover thingy! Darn. I caught the metal plate on the bottom hinge using a chainsaw file, thanks to MogBob for his advice on this![frame]

[/frame]
Re: Edd's 1969 2 door. UHU62H
Posted: Mon Dec 08, 2014 5:33 pm
by panky
I hade a similar problem with my comer camper door hinges, big slot drive counter sunk screws that just wouldn't budge

What I did was to get the MIG out and build weld up on the screw head a bit at a time until there was enough to grab with mole grips and they came out easily, the heat probably had a lot to do with it (even though I did have a blow lamp on it before - and they still wouldn't go) and the bonus was I cleaned them up, cut new slots into them and re-used them

. Did the same thing with a sheared off exhaust manifold stud on the same van.
Looks horrible, but it works