Page 6 of 7
Re: New Traveller Restoration Undertaken
Posted: Wed Nov 15, 2017 6:29 pm
by Smithy1961
Its been a while since I have posted.
Ive been ready to start assembly since Aug. however I remember last winter doing the under bonnet o/haul and how cramped and cold/miserable it was.
So it was decided that the assembly needed more space and better working conditions .
A new work area is easier said than done but this was needed.
There was room [if cleared of brambles and tree like bushes ] that the garage could be extended backwards so I started on a 15 foot extention with a 8 foot shed connected to it for a parts area.
Money was limited so it had to be all recycled wood.Its taken a long time and tons of hours but now its complete and ready to restart this project. Its only remains to paint it and move in [It will be all one area now as the rear wall of the original garage will be removed].

- 1.JPG (208.9 KiB) Viewed 5252 times

- 5.JPG (159.75 KiB) Viewed 5252 times

- 7.jpg (140.59 KiB) Viewed 5252 times

- 8.jpg (171.38 KiB) Viewed 5252 times

- 13.jpeg (138.07 KiB) Viewed 5252 times

- 21.jpg (176.87 KiB) Viewed 5252 times
Re: New Traveller Restoration Undertaken
Posted: Thu Nov 16, 2017 11:55 am
by SageGreenPete
That looks like a much better use of that area, nice one!
Re: New Traveller Restoration Undertaken
Posted: Wed Dec 06, 2017 10:20 pm
by Smithy1961
Yes Pete,
It was an epic journey I had to make to complete this project .
I needed this space to do justice to next phase to reassemble .
I completely filled the parts area with spares , and more than doubled my work area .

- 34.jpeg (1.01 MiB) Viewed 4849 times

- 35.jpg (2.51 MiB) Viewed 4850 times

- 36.jpg (2.18 MiB) Viewed 4850 times

- 37.jpeg (963 KiB) Viewed 4850 times
Re: New Traveller Restoration Undertaken
Posted: Thu Dec 07, 2017 1:00 am
by irmscher
Might be an idea to stick some insulation board on the walls to keep the damp out and you warmer

you have done a really good job .
Re: New Traveller Restoration Undertaken
Posted: Thu Jan 11, 2018 8:33 pm
by Smithy1961
Yes Irmscher its been a hard month,
I have had to work out more than just heat.
Seems i made a mistake with the pitch of the roof and have be plagued with leaking , I then started treating it as a flat roof and started to cover it in tar rather than felt.
I had to also seal the original garage [lots of expandable foam] I still havent insulated it in any way and am relying on old aladdin heaters to keep warm ; very effective they are ] old tech. is sometimes better.
Im nearly there but my bad building skills have cost me another month away from restarting this project.
Re: New Traveller Restoration Undertaken
Posted: Sun Jan 14, 2018 9:52 am
by sid
love the new garage / shed extension
did you need planning approval for it? giving me a few ideas now..
Re: New Traveller Restoration Undertaken
Posted: Sun Jan 14, 2018 1:34 pm
by Smithy1961
There was no need for permission Sid,
Its allowed under permmitted development rules , there are some height rules depending on the roof type and you cannot have more than 50 percent of your total curtilage [excluding the area of the dwelling house] under cover. It cannot be connected to a main dwelling to be classed as an out building and cannot infringe on the principal elevation of the main dwelling . Its purpose must be incidental to the enjoyment of the main dwelling and most importantly it, in its self cannot be a dwelling.
http://www.legislation.gov.uk/uksi/2015 ... tents/made
Re: New Traveller Restoration Undertaken
Posted: Sun Jan 14, 2018 5:30 pm
by Mark Wilson
But it is subject to Building Regulations. Suggest you keep your head down and don't tell them, though.

Re: New Traveller Restoration Undertaken
Posted: Mon Jan 15, 2018 1:53 pm
by biomed32uk
When I added 13' to my garage a couple of years ago, again all because of the Minor it was under permitted development and did not need a full planning application.
The planning Dept. advised I let building control know but did say it was a grey area, of course I never bothered with that and just got on with the job, ot least a local builder did.
Re: New Traveller Restoration Undertaken
Posted: Sat Feb 24, 2018 3:14 pm
by Smithy1961
Finally after the long shed build Im back to assembly .
Im hoping to have most of the main wood frame back together in about two months [only get to work on it a few hours a week]
Ive started by putting a varnish seal on the inside to act as a water barrier, in the next few weeks I hope to fully assemble both sides and do a trial fit.

- 1.JPG (76.46 KiB) Viewed 4690 times

- 2.JPG (91.39 KiB) Viewed 4690 times

- 3.JPG (91.34 KiB) Viewed 4690 times
Re: New Traveller Restoration Undertaken
Posted: Sat Feb 24, 2018 4:02 pm
by mogbob
Is that a heater I spy in photo No 2 ? Why would you want a heater in this weather ? I think I'd need two or three in my garage at the moment !
Any way you seem to be making a good job of the varnishing. How many more coats to go ?
Bob
Re: New Traveller Restoration Undertaken
Posted: Sat Feb 24, 2018 4:06 pm
by Smithy1961
Another coat should do
As for heaters its freezing right now i have three small aladdins and an aladdin blue flame they keep the chill off nicely [no condensation in side at all] If im working I like to be warm .
Re: New Traveller Restoration Undertaken
Posted: Sat Feb 24, 2018 4:24 pm
by Smithy1961
I had added the cheapest of insulation to the ceiling and its really helped retain the heat . I think the whole insulation was only 30 quid [probably less] but it gets nice and warm now and retains it. Prior to adding it heat was very hard to retain and condensation was a real problem .Its looking like a real cold spell is about to hit us next week so im glad Im at least a little ready.
Re: New Traveller Restoration Undertaken
Posted: Sun Apr 08, 2018 2:25 pm
by Smithy1961
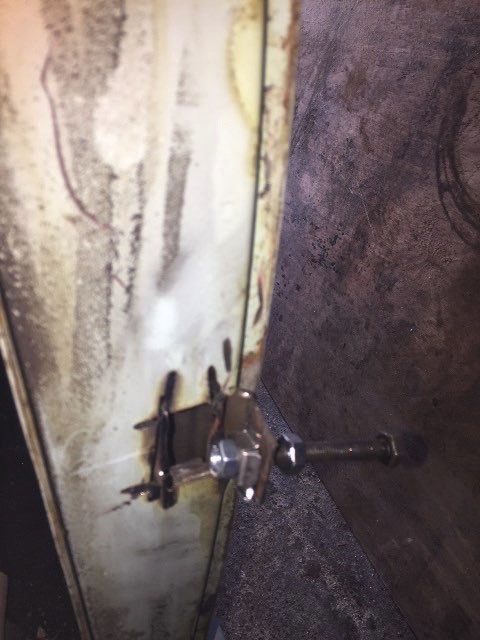
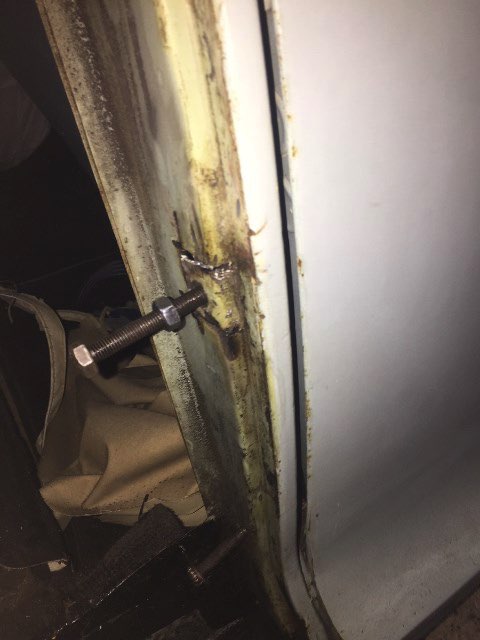
Been moving on with the project.
Doing two things at once,
First I'm repairing the bad captive nuts in the B pillar [not easy, I went for peeling it open welding in new cages with new square nuts I got from ESM then once I confirmed they were in the right place I welded back up] Its hidden behind the wood so ugly ain't a problem just the correct position and strength is.
At the same time, I'm trying to fit the aluminum panels and wings to the wood.
I'm hoping a few more weekends and I can fit the sides permanently.

- 1.jpg (27.72 KiB) Viewed 4470 times
- 2.jpg (52.45 KiB) Viewed 4470 times
- 3.jpg (42.87 KiB) Viewed 4470 times

- 4.jpg (78.88 KiB) Viewed 4470 times

- 5.jpg (49.38 KiB) Viewed 4470 times
Re: New Traveller Restoration Undertaken
Posted: Wed Mar 06, 2019 9:35 pm
by Smithy1961
I wonder how many others have started a project only to have to put it on the back burner...
Well Im restarting this one
Re: New Traveller Restoration Undertaken
Posted: Fri Mar 08, 2019 10:00 am
by mogbob
Life , health and general stuff gets in the way of most people , so don't beat yourself up about taking a rest from your labours.
Good on you .. attack with renewed vigour …...you'll get there and then you can wear a silly grin with pride saying " I did that ! "
Bob
Re: New Traveller Restoration Undertaken
Posted: Sat Mar 09, 2019 11:04 am
by jimmy167
Looking forward to seeing the wood back on ,you are doing a great job .
The spring is just round the corner .
I like the under bonnet sound proofing ,where did you get it ?
I would like to put it on my Traveller .
Re: New Traveller Restoration Undertaken
Posted: Sun Mar 10, 2019 6:11 pm
by Smithy1961
Jimmy ,
I got the soundproofing pad from Newton Commercial.It makes a massive difference.
Re: New Traveller Restoration Undertaken
Posted: Sun Mar 10, 2019 6:32 pm
by Smithy1961
I upgraded the work area a bit,
I concreted all the floors then added rubber connecting mats ,Lined the walls with 5/8 ply after insulating, Added lots more fitted lights and socket outlets, And finally mounted a big vice on the work bench.

- 1.JPG (96.25 KiB) Viewed 3628 times

- 2.jpeg (125.32 KiB) Viewed 3628 times
Re: New Traveller Restoration Undertaken
Posted: Sun Mar 10, 2019 9:38 pm
by jimmy167
Thanks Smithy, I'll get one of these , how is it attached ?
Your extension looks good

.