Page 2 of 7
Re: New Traveller Restoration Undertaken
Posted: Fri Mar 03, 2017 10:33 pm
by irmscher
Light oak will look good with smoke grey

Re: New Traveller Restoration Undertaken
Posted: Sat Mar 04, 2017 6:25 pm
by Smithy1961
Yes Im waiting for a sample of ash to test the stain on . I got Sikkens filter 7 plus stain.
I struggled with the mini heater but got it fitted ,I want to work out a solution for the air intake .
the older cars have an intake on the floor and later via an ugly pipe to the front grill , neither are good for me fume wise , as the mini heater has two vanes and an intake to recirulate Im thinking an intake with an on and off mechanism.
Re: New Traveller Restoration Undertaken
Posted: Sun Mar 19, 2017 3:00 pm
by Smithy1961
Finally got the heater in and working, done a few more bits and bobs under the bonnet.
Working on the bonnet now got a nice soundproofing pad an extending bonnet prop .
- 2.jpg (104.42 KiB) Viewed 3490 times

- 1.jpg (123.66 KiB) Viewed 3490 times
Re: New Traveller Restoration Undertaken
Posted: Sat Mar 25, 2017 4:19 pm
by Smithy1961
Painted the surrounding area that the bonnet closes on in the engine bay and got the bonnet and bonnet brace painted and adding the bonnet sound proofing.

- Screen Shot 2017-03-25 at 16.23.49.jpg (158.1 KiB) Viewed 3472 times
All most done under in the engine bay[under bonnet area].

- Screen Shot 2017-03-25 at 16.23.38.jpg (208.35 KiB) Viewed 3472 times
Re: New Traveller Restoration Undertaken
Posted: Sat Mar 25, 2017 4:33 pm
by greendefender123
That looks really good. Well done. Does the bonnet sound proofing make much difference?
Re: New Traveller Restoration Undertaken
Posted: Sat Mar 25, 2017 4:54 pm
by Smithy1961
Well it looks good and is suppose to really suppress the noise
Re: New Traveller Restoration Undertaken
Posted: Sat Mar 25, 2017 5:17 pm
by Smithy1961
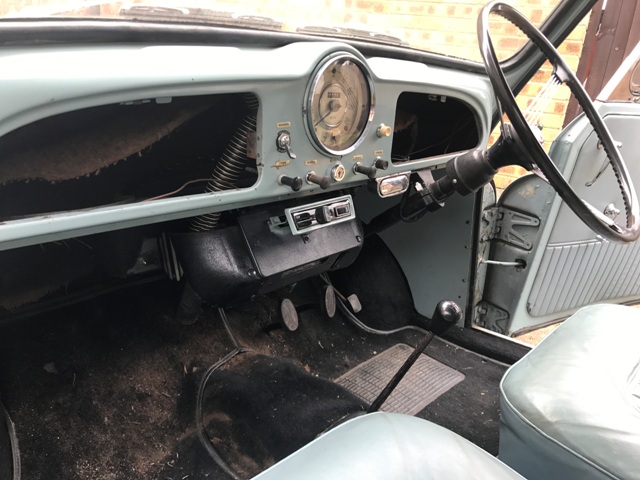
This was how it was before
Re: New Traveller Restoration Undertaken
Posted: Sat Mar 25, 2017 9:30 pm
by SageGreenPete
Love the BMC green servo!
Re: New Traveller Restoration Undertaken
Posted: Fri Mar 31, 2017 5:26 pm
by Smithy1961
Yes the BMC green servo ....Thats going to be balanced by the big original horn assembly thats to be fitted on the other side thats also BMC green
Re: New Traveller Restoration Undertaken
Posted: Fri Mar 31, 2017 7:18 pm
by Smithy1961
So onto doing the brakes next.
Got all needed to change from 7 inch to 8 inch on the front . This is going to be driven sedately so that with the servo on the front only should work and make it a bit easier.
The rears are sticking on so all new clyds front and back new flex hoses, shoes and front drums.
So far its the cost of the later front adjusters and masks that seem expensive but you got to get what you got to get...
Re: New Traveller Restoration Undertaken
Posted: Sat Apr 08, 2017 10:18 am
by Smithy1961
Got the new front 8 inch brakes built on the bench ready to fit and now turning also to the wood.
Got a complete kit coming [Woodies, ETA now only a few weeks I hope] together with inner waist cappings but I was hoping to reuse the top hoop, the 2 b post cappings and upper cappings, these are in perfect condition, however the problem is the interior was stained a very deep brown so I have been attempting to bleach that colour out so everything will be light oak and match. Seems to be working.

- 2 (2).jpg (42.27 KiB) Viewed 3422 times

- 2 (1).jpg (48.98 KiB) Viewed 3422 times
Next will be taking all the wood off and looking at any repairs that are needed prior to new wood fitting . Im looking forward to this stage.
Re: New Traveller Restoration Undertaken
Posted: Sat Apr 08, 2017 9:42 pm
by SageGreenPete
If the rest comes out like the engine bay thats going to be a crackin' traveller! I'm crap at woodwork, I'd make a right mess of it.
Re: New Traveller Restoration Undertaken
Posted: Sun Apr 09, 2017 1:27 pm
by Smithy1961
Attached the bonnet [much better access with the new extending bonnet prop]
Re: New Traveller Restoration Undertaken
Posted: Sun Apr 09, 2017 1:33 pm
by Smithy1961
Re: New Traveller Restoration Undertaken
Posted: Sun Apr 09, 2017 2:52 pm
by greendefender123
That bonnet prop looks a good idea! Hope you don't find to many disasters when you take the wood off.
Re: New Traveller Restoration Undertaken
Posted: Tue Apr 11, 2017 11:32 pm
by jagnut66
Hi,
I've fitted one of those extending props too. They are excellent value for money, creating so much more room to work / remove the engine when needed.
Plus I was fed up with banging my head!!.......................... 
Looks like you bought that new wood in the nick of time.
Best wishes,
Mike.
Re: New Traveller Restoration Undertaken
Posted: Wed Apr 12, 2017 6:29 pm
by Smithy1961
Yes still lots to do.
The wood replacement Im expecting to be an epic journey.
Im not so scared about the wood in this phase of the work per say as much as some of the things you have to tackle like the roof/guttering and my main dread the headlining.
Re: New Traveller Restoration Undertaken
Posted: Wed Apr 12, 2017 6:49 pm
by Smithy1961
At some point doing the wood im going to fit a split charging battery system.
The Aux. battery to be fitted somewhere in the rear .
The Idea is when camping It has its own 12 volt deep cycle supply that can be used with access plugs in the rear that if over used wont drain the main battery .
I fancy having the ability to have 12 volt lighting and maybe a cooler back there. I fitted a high output alternator with this in mind.
Re: New Traveller Restoration Undertaken
Posted: Wed Apr 12, 2017 9:25 pm
by greendefender123
With regards to the wood and gutter if I can do it looking alright/good im sure youll have no problems. I made a split charge system in my landy. All I had was a relay between the 2 batteries and wired the relay to come on with the "ignition" was handy if you left the lights on. You can also do it with voltage sensitive relays or just a simple switch and remember to flick it on or off. Should be good with the battery in the back. You could also build it into a box and take out by just unplugging when your not using it. Or to use it as a portable power pack.
Re: New Traveller Restoration Undertaken
Posted: Mon Apr 17, 2017 3:34 pm
by Smithy1961
I started on the wood to day and got about a third done .
The wood was well rotten [that actually made it a bit easier ]. Im hoping to see the rest off over the next two weekends so I know what metal repairs are needed but so far so good.
- 3 (1).jpg (133.43 KiB) Viewed 3353 times

- 3 (2).jpg (55.53 KiB) Viewed 3353 times

- 1.jpg (146.2 KiB) Viewed 3353 times