Page 11 of 14
Re: Rose Taupe Traveller Restoration- update 36 - Jan 2013
Posted: Mon Jan 07, 2013 3:53 pm
by taupe
Ian
Yes they are original and no they arent available, but could be cut from a block of rubber. Ill post up some dimensions if you are interested.
Don
Yes, If I knew my bodywork was spot on I would modify the wood to fit!
My original timber was very very rotted and falling apart at the joints so dimensions taken were not much assistance.
There was a set of 50 blueprints for the traveller timber frame a few years ago on ebay.. Im kicking myself now

I dont have any dimensions which is why I bought pre assembled frames.. I had a full dismantled frame kit in parts but bits were from various sources designed for repair of individual sections and as the rear end of my traveller was slightly out of place I therefore could not work out the correct fit for the joinery. I didnt want to find that the body was then miles out if the frame needs replacing in future!
Now I have the assembled frames I will have a go at assembling the spare ones using the new for reference.
Taupe
Re: Rose Taupe Traveller Restoration- update 36 - Jan 2013
Posted: Mon Jan 07, 2013 5:25 pm
by ian.mcdougall
When available the dimensions would be most appreciated thanks
Re: Rose Taupe Traveller Restoration- update 36 - Jan 2013
Posted: Mon Jan 07, 2013 5:41 pm
by taupe
Ian
Here you go...
They act as bump stops for the glass and are fitted in the top channel at the ends of the fur window channels. The two chrome screws go in just over half way.
EDIT
Now that the rubber has relaxed I can see a part number on the larger block ...AFH 594 !
Taupe[frame]

[/frame]
Re: Rose Taupe Traveller Restoration- update 36 - Jan 2013
Posted: Tue Jan 08, 2013 11:04 am
by ian.mcdougall
Thanks will save for later use when replacing wood one one of my travellers
Re: Rose Taupe Traveller Restoration- update 36 - Jan 2013
Posted: Tue Jan 08, 2013 11:47 am
by chickenjohn
Hi Taupe,
great to see you back at work on your traveller!!!

Great bargain with the wood! BTW, Travellers Timbers also do "seconds" sets which are cheaper than the expensive perfect sets. Only issues are a few imperfections such as knots etc.
The advice I've always heard about getting the wood and floor pan to mate up is to restore the floor pan (i.e. fitting new inner rear wings and wood mounting flange to suit the wood you have rather than trying to adjust the wood to fit the metal.
And this will usually be the case as rotten wood on a traveller usually hides rotten steel!
Re: Rose Taupe Traveller Restoration- update 36 - Jan 2013
Posted: Sun Jan 13, 2013 11:37 am
by taupe
Hi
I’ve been doing repairs to the nearside rear chassis leg, floor and bump stop area today. I am much more comfortable doing this now that I have been able to check the fit of the wood frames.
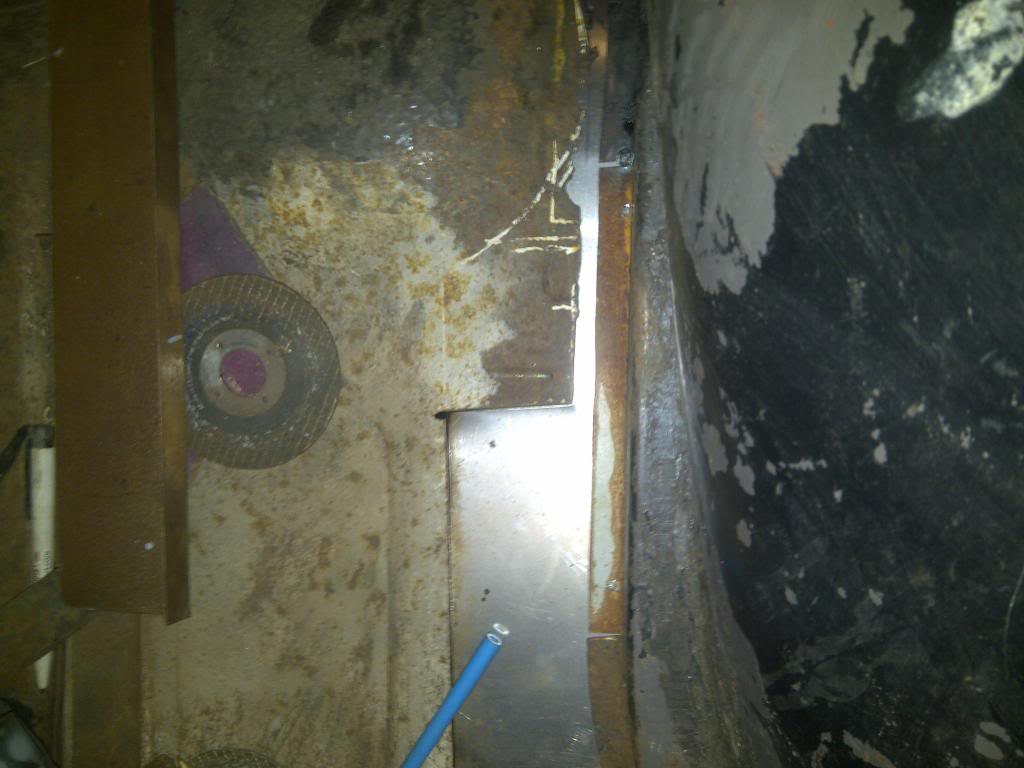
I started by making up a short repair angle for the top half of the rear chassis leg, fitting a brass bar behind to reduce distortion and then seam welding in with the MIG. I have to replace another section between this and the step sill but will do this later…. You can see the rust in the last pic.

- TravellerpicsJan013_zps89cee577.jpg (99.87 KiB) Viewed 2548 times

- TravellerpicsJan014_zps933d19f7.jpg (67.7 KiB) Viewed 2548 times

- TravellerpicsJan016_zps974cd321.jpg (56.27 KiB) Viewed 2548 times

- TravellerpicsJan022_zps2b3934c7.jpg (78.62 KiB) Viewed 2548 times
I then cut out the rot from the bottom of the bump stop reinforcement bracket and welded in a new 16 SWG plate.. I used gas welding for this.

- TravellerpicsJan018_zpsa063d566.jpg (79.8 KiB) Viewed 2548 times

- TravellerpicsJan019_zps2c92a7b6.jpg (63.02 KiB) Viewed 2548 times

- TravellerpicsJan021_zps57bf004b.jpg (63.54 KiB) Viewed 2548 times
The next job was making the bottom section of the chassis rail, which is in fact an extension of the main floor panel. This repair runs from the spring hanger plate back beyond the bump stop location…. It was very rotten on my car and had been badly plated over with about three layers of metal!!!.
I wedged in a 20 SWG plate and bent it crudely into shape, then clamped at the bump stop bracket to create the curve and put in a couple of self tap screws to secure. I then bent the front end down slightly and marked down vertically from the edge of the inner wheel arch panel. I used folding pliers to bend down the edges and form the ‘bulge’ around the bump stop bracket.

- TravellerpicsJan026_zps836c5e6e.jpg (104.26 KiB) Viewed 2548 times

- TravellerpicsJan037_zpsdd01a7b5.jpg (62.07 KiB) Viewed 2548 times
cont below .....
Taupe
Re: Rose Taupe Traveller Restoration- update 37
Posted: Mon Jan 14, 2013 9:00 pm
by taupe
cont from above...

- TravellerpicsJan035_zpse7505ff2.jpg (112.68 KiB) Viewed 2546 times

- TravellerpicsJan034_zps9b42749c.jpg (76.78 KiB) Viewed 2546 times
A bit of final adjustment and trimming will be required once I have cut away the old wheel arch panel and trial fit the new one.
I’ve drilled through the hole for the exhaust mount, which as you can see is in line with the screws securing the spring hangers, these will soon be replaced with rivets secured hot once I’ve replaced the section of chassis rail at this point.

- TravellerpicsJan030_zpsda7e7630.jpg (77.25 KiB) Viewed 2546 times
In these last two pics you can see the angle repair from the inside and the new section of floor.
- TravellerpicsJan036_zpsf8695dbf.jpg (70.03 KiB) Viewed 2546 times

- TravellerpicsJan038_zps0a6de25c.jpg (104.24 KiB) Viewed 2546 times
Taupe
Hi
A small update…
Tonight I’ve been making a repair section for the rear chassis rail where it passes under the rear seat support panel.
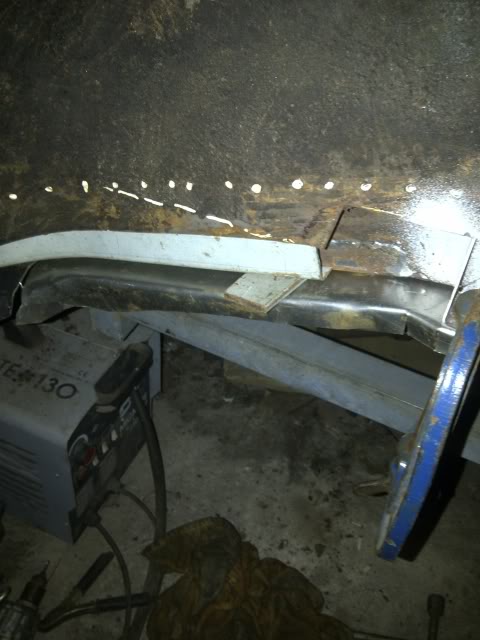
I started with a piece of 16 SWG steel angle which I used my stretcher /shrinker tool to form to the correct curves. It was trial fitted by sliding into place within the chassis and checking the correct curve against the remaining chassis section. I am making a similar one for the other side which is a mirror image.
Here are some pics
This is the bit that needs replacing

- TravellerpicsJan022_zps2b3934c7.jpg (78.62 KiB) Viewed 2546 times
And this is the repair taking shape

- Image092-1.jpg (50.56 KiB) Viewed 2544 times

- TravellerpicsJan047.jpg (41.39 KiB) Viewed 2545 times

- TravellerpicsJan044.jpg (42.93 KiB) Viewed 2545 times

- TravellerpicsJan043.jpg (55.45 KiB) Viewed 2545 times
- TravellerpicsJan042.jpg (43.15 KiB) Viewed 2545 times
Tomorrow I will cut out the rusty bits and fit the nearside one of these but I need to grind some metal away first for access and also remove the temporarily fitted wood frame.
Taupe
Re: Rose Taupe Traveller Restoration- update 37
Posted: Tue Jan 15, 2013 4:28 pm
by chickenjohn
Great work Taupe! Shrinker stretcher is a great tool, isn't it!
Re: Rose Taupe Traveller Restoration- update 37
Posted: Tue Jan 15, 2013 4:42 pm
by taupe
Thanks Chickenjohn!
Yes they are a very useful tool and although this one is only meant to do 18 swg steel it copes easily with the 16 swg ... I of course take it easy and dont force it. The old way of doing this was heating the flange with a gas torch and using a shrinking hammer or using a stake and hammering to stretch it. The control of the shape you get with the shrinking tool is fantastic, well worth getting one if your doing more than a few minor body repairs.
Taupe
--------------------------------------------------------------------------------------------------------------------------
Hi
I’ve been making two new Traveller sill reinforcement panels tonight…
After a lot of measurements and reference to those fitted on other Travellers. I’m finally happy that I have reasonably correctly replicated the original panel.
The only thing that I have done slightly different is the bottom flange … I have made this narrower so that it doesn’t cover the drain slots like the original panel does.. this is presumably why the rust sandwich formed is usually completely rotted out!!
Heres are some pics of other peoples sills..


I started by marking out and then cutting out the blank sheet with a jigsaw.


I decided to make each panel in two parts to make the forming easier and for the separate bottom front section I folded the edge over some angle iron and then put the two sets in


Re: Rose Taupe Traveller Restoration- update 37
Posted: Tue Jan 15, 2013 8:27 pm
by Dryad
Glad to see you're back, taupe. More inspiration for us Traveller restorers! I would be out in my garage working on mine now if it wasn't -7 degrees C!
Re: Rose Taupe Traveller Restoration- update 37
Posted: Sat Jan 19, 2013 11:17 pm
by alexandermclaren
great work keep it up
Re: Rose Taupe Traveller Restoration- update 38
Posted: Thu Feb 07, 2013 2:02 am
by taupe
Hi
I’ve been making two new Traveller sill reinforcement panels tonight…
After a lot of measurements and reference to those fitted on other Travellers. I’m finally happy that I have reasonably correctly replicated the original panel.
The only thing that I have done slightly different is the bottom flange … I have made this narrower so that it doesn’t cover the drain slots like the original panel does.. this is presumably why the rust sandwich formed is usually completely rotted out!!
Heres are some pics of other peoples sills..
I started by marking out and then cutting out the blank sheet with a jigsaw.
I decided to make each panel in two parts to make the forming easier and for the separate bottom front section I folded the edge over some angle iron and then put the two sets in
I then formed the centre pressing; again hammering over some angle iron and forming the rear bottom flange. I’ve made this 30mm wide and the front part 15mm wide


Then I folded the top edge all the way along..

The front section was then trial fitted..


I have to fit a thick plate and 7/16” UNF nut here for the seat belt mounting

Here is the panel next to a pattern one…..they are ok, but as usual the pattern one is a bit thin (it should be 1.2mm or 18SWG) and it doesn’t come with the pressed in section which I wanted to duplicate.


This is what the pressed bit should look like

I now have to put a gentle curve in the whole panel with the stretcher tool to match the step sill curve which it fits inside and will need to seam weld the front section.
I will trial fit it in the sill first.

Now time to get on with the other one….
Taupe
Re: Rose Taupe Traveller Restoration- update 38
Posted: Fri Feb 08, 2013 12:10 pm
by Mark Wilson
Taupe, fantastic devotion to near original detail and superb craftsmanship.
By way of contrast I approached this with a morbid fear of the dreaded rust sandwich, you'll see why from my first picture. I used a hefty piece of steel sheet (2.0mm, I think) folded to an angle for me by my local friendly steel fabricator, then cut it to shape to leave a decent gap above the floor extension panel. I also used this to address another concern I had, the structural continuity of the new sill step to the rear box section below the seat, by extending the angle into this rear section. (I removed the flange from the new sill step, left a short stub of the original step and plug welded through to the angle each side of the butted joint as well as welding the joint itself.)
I then plug welded the sill step along both faces of the angle. You can just about see the angle on my final photo, showing my obsession with seam sealing and painting the inner section before fitting the boxing panel. With a hefty dollop of Dinitrol I'm hoping this will keep the rust at bay for a few more years.....
Mark
[frame]

[/frame][frame]

[/frame][frame]

[/frame][frame]

[/frame]
Re: Rose Taupe Traveller Restoration- update 38
Posted: Mon Oct 21, 2013 8:49 pm
by jagnut66
How's the traveller coming along? Any updates?
Re: Rose Taupe Traveller Restoration- update 38
Posted: Tue Oct 22, 2013 10:12 pm
by taupe
Re: Rose Taupe Traveller Restoration- update 38
Posted: Tue Oct 22, 2013 10:57 pm
by jagnut66
Great work as always. I guess time is a major factor with you in getting things done, as you are making all the panels yourself.
It must be a positive boost for you to see the strength returning to the shell though, as you let more fresh metal in.
I look forward to your next installment.......
Re: Rose Taupe Traveller Restoration- update 38
Posted: Wed Oct 23, 2013 8:59 am
by Dryad
Very nice work indeed!
Re: Rose Taupe Traveller Restoration- update 38
Posted: Sat Jan 18, 2014 6:24 pm
by volrod544
Just come across this restoration,really great fabrication going on.
Pete
Re: Rose Taupe Traveller Restoration- update 39
Posted: Mon May 12, 2014 8:44 pm
by taupe
Hi
Fairly slow progress on the Shell.. the sills and floors are all done and Im working on aligning the front panels, doors and wings..
Ive repaired the corroded axle casing today...one side was fine, on the other the perch and under the rubber bump pad are very corroded so much so that I decided it better to cut a section out and replace...
The metal removed was between 1 and 2 mm thick and should be at least 3mm..at a couple of points it was pinholed right through....
Ive ordered a pair of new perches from ESM.
Here are some pics..
The bad side

The good side

See the amount of corrosion..


I started by removing the half shaft, then cutting out..


After cutting I wiped out all the grinding grit and stuffed a sponge up to stop it going towards the diff. Yes I did remember to remove it afterwards !!

Then prepped for welding

I had some 3mm tube of about the right diameter so cut out a suitable section..

Improvised a hub puller so I could get the brake plate off prior to welding.. BMCE had already been at the hub nut with his chisel so my spanner was useless...


View with the half shaft in

Set the Mig to MAX and fully welded

I will take the Diff unit off when welding is finished and wash out the banjo legs...
Just need to wait for the new perches to arrive now..

Taupe
Re: Rose Taupe Traveller Restoration- update 39
Posted: Wed May 14, 2014 7:06 pm
by taupe
Hi
My new axle perches arrived from ESM, they are fit for purpose …but are not the original pressings shown on their spares site so will be returned and I will have to fabricate a replacement or patch the old one… apparently original pressings have not been available for some time…
Talking of pressings I ordered a new ¼ LH front floor from ESM for my latest traveller and can confirm that they are a super fit and are now the correct thickness steel… Ill cut out what I need and seam weld it in..

Ive completed two more jobs on the traveller, first I made a new fuel pipe guard for the rear compartment…nice and shiney stainless steel !!!


Ive also obtained 22 ¼ BSF threaded brass inserts for fixing my rear wings.
The original fitment was an expanding steel insert. These new ones are screw in type and are less likely to corrode and stain the wood. I decided to fit inserts as I can then easily unbolt the wings for maintenance and with the large oval slotted holes in the wings as original there is some scope for final adjustments when fitting..
The last pic I tried one in the original hole..the woods a bit rotten but you get the idea...


Taupe


