1949 Tourer from Aus
Forum rules
By using this site, you agree to our rules. Please see: Terms of Use
-
- Minor Legend
- Posts: 2646
- Joined: Thu May 11, 2006 10:34 am
- Location: Cardiff
- MMOC Member: Yes
Re: 1949 Tourer from Aus
Just had a major "Oh Ar5e!" moment. Have re-tapped the wing bolt holes 5/16 UNF instead of 5/16 BSF. 22tpi against 24tpi so not the end of the world (not quite, anyway)
Well, at least I didn't go metric.
Cardiff, UK
-
- Minor Legend
- Posts: 4064
- Joined: Tue Dec 07, 2004 8:50 am
- Location: Margate, East Kent
- MMOC Member: No
Re: 1949 Tourer from Aus
I keep my BSF and UNF taps and dies seperate so they don't get mixed up.
I like the colour!
I like the colour!
-
- Minor Legend
- Posts: 2646
- Joined: Thu May 11, 2006 10:34 am
- Location: Cardiff
- MMOC Member: Yes
Re: 1949 Tourer from Aus
Thanks, CJ. Well, I've got 2 litres of lighter green so I might as well use them for an undercoat. Cup of tea but no chocky bikkie until I get 'her indoors' the right colour paint.[frame][/frame]
Next disaster came when I hung the original door and the repaired front wing. Spot the problem?[frame][/frame]
I sent it away to be repaired because I didn't want to do this particular job but it looks like I'm going to have to cut out all of the pro repair and get a better fit by myself. Quite a long way out and no way to adjust it to follow the curvature of the door without taking a slice or two out and rewelding.[frame][/frame]
Cardiff, UK
-
- Minor Legend
- Posts: 2646
- Joined: Thu May 11, 2006 10:34 am
- Location: Cardiff
- MMOC Member: Yes
Re: 1949 Tourer from Aus
One of those 'weird angle' shots that shows how lowlights have a cut out section of front arch to allow the lights to fit. A cowl goes over the lamps to keep the water out.[frame][/frame]
Aaaaaaand here's one I made earlier...(about 12 months earlier)[frame][/frame]
Yes, it IS the same car!
Aaaaaaand here's one I made earlier...(about 12 months earlier)[frame][/frame]
Yes, it IS the same car!
Cardiff, UK
-
- Minor Maniac
- Posts: 7845
- Joined: Thu Jan 25, 2007 3:18 pm
- Location: South East London
- MMOC Member: No
Re: 1949 Tourer from Aus
It's a shame they didn't find a way to do this on the later cars, notorious rust trap above the lights on them.A cowl goes over the lamps to keep the water out"
"Once you break something you will see how it was put together"
-
- Minor Legend
- Posts: 2180
- Joined: Fri May 30, 2008 9:41 pm
- Location: Sutton Coldfield
- MMOC Member: No
Re: 1949 Tourer from Aus
RobThomas wrote:I sent it away to be repaired because I didn't want to do this particular job but it looks like I'm going to have to cut out all of the pro repair and get a better fit by myself. Quite a long way out and no way to adjust it to follow the curvature of the door without taking a slice or two out and rewelding.
Ouch.... one of those "Oh! diddums" moments. Obviously with the skills you have, you can strive for the finish you can possibly get. Unfortunately we'll probably never know how good or bad the original fit actually was. One of my front wings is shorter than the other side. No amount of messing with the door or the wing can get the wing to door gap looking anything like okay. Neither needed repairing!
My Minor:
A Clarendon Grey 1953 4 Door Series II.
MMOC - 66535
A Clarendon Grey 1953 4 Door Series II.
MMOC - 66535
-
- Minor Legend
- Posts: 2646
- Joined: Thu May 11, 2006 10:34 am
- Location: Cardiff
- MMOC Member: Yes
Re: 1949 Tourer from Aus
All of the panels are the originals from 1949 and the corrosion of the rear edge was not enough to affect the shape, so, I can't understand why it was welded so far out when it was a perfect fit before. Holding a steel rule over the area shows that the repair doesn't follow the shape/curve of the rest of the panel so it was never going to fit. Oh well, time to break out the TIG welder again.
Does anyone know if the beading rubber goes all of the way along between wing and body?[frame][/frame]
Cardiff, UK
-
- Minor Legend
- Posts: 4064
- Joined: Tue Dec 07, 2004 8:50 am
- Location: Margate, East Kent
- MMOC Member: No
Re: 1949 Tourer from Aus
Looks like the repair panel was gas welded and the heat caused distortion. That is a difficult area to gas weld and shape properly when repairing it as there is not enough room to get a hammer and dolly behind to dress down the distortion as is usual in gas welded repairs. If you have to cut out the repair, it might be better to hole punch the wing and joddle the new repair panel to enable a plug welded join- much less distortion. OK, I don't like overlaps- as they can trap moisture and encourage rust- but where there is a big danger of heat distortion in a highly visible are and a panel gap/ line can be spoiled then the joddle and plug weld (lead loaded over the top to finish) is a good quality repair.
OR, you could try tapping down the edge of the wing that sticks up with a dolly held hard underneath the gas weld area. That should help bring the edge down and the weld up and flatten the panel. Worth a go before cutting the repair off.
Cheers John - all comments IMHO
- Come to this years Kent branches Hop rally! http://www.kenthop.co.uk
(check out the East Kent branch website http://www.ekmm.co.uk )
- Come to this years Kent branches Hop rally! http://www.kenthop.co.uk
(check out the East Kent branch website http://www.ekmm.co.uk )
-
- Minor Legend
- Posts: 2646
- Joined: Thu May 11, 2006 10:34 am
- Location: Cardiff
- MMOC Member: Yes
Re: 1949 Tourer from Aus
Tea break. No biscuit. Paintshop shut until Tuesday. Disaster!
Hmmmmmmmm. I may have worked out what happened. If the folded edge is folded straight along its' length then it needs to be rolled to form the curved door edge and then it needs stretching so that the area about 2 inches forwards of the door is longer from top to bottom. The wing is 3D here and if you weld the foremost edge of your repair onto the wing it will not sit right at the back. Does this make sense?][frame][/frame]
There is too much material to 'lose' for it to be beaten with a BFH into shape so I'm going to try a first attack with a thin cutting disc and then TIG welding it closed after leaning the slotted bits downwards, if you see what I mean. Very little heat with TIG so you can weld a wing without it burning the paint on the next panel. If this all fails then I'll cut the whole shebang off and butt weld a new piece on. Not so easy but a bit more solid. Here is a quick photo showing what I mean. Ends need tidying up a bit!
[frame][/frame
Cardiff, UK
-
- Minor Legend
- Posts: 2646
- Joined: Thu May 11, 2006 10:34 am
- Location: Cardiff
- MMOC Member: Yes
Re: 1949 Tourer from Aus
Another tea break. Still no biscuit.
Lead loading first coat completed. It actually sits flush but I haven't bolted it all down in this shot.[frame][/frame]
Mysterious (nosy) tea-toting ghostly figure seen in the background.[frame][/frame]
Lead loading first coat completed. It actually sits flush but I haven't bolted it all down in this shot.[frame][/frame]
Mysterious (nosy) tea-toting ghostly figure seen in the background.[frame][/frame]
Cardiff, UK
Re: 1949 Tourer from Aus
Rob
Unless the MM was different theres no piping on the front wings.
Taupe
Unless the MM was different theres no piping on the front wings.
Taupe
-
- Minor Legend
- Posts: 2646
- Joined: Thu May 11, 2006 10:34 am
- Location: Cardiff
- MMOC Member: Yes
Re: 1949 Tourer from Aus
OK, thanks for that. Shame, really, 'cos I'll have to spend more time farting about smoothing the edges!
Anyway, it is looking a bit better afetr a little skim of stopper.[frame][/frame]
Still no biscuit, though.
Anyway, it is looking a bit better afetr a little skim of stopper.[frame][/frame]
Still no biscuit, though.
Cardiff, UK
-
- Minor Legend
- Posts: 2646
- Joined: Thu May 11, 2006 10:34 am
- Location: Cardiff
- MMOC Member: Yes
Re: 1949 Tourer from Aus
'The Keeper of the Biscuits' has just shown me a pic of the red Ray Newell car and it DOES have beading between the front wings and body. The plot thickens!
Cardiff, UK
-
- Minor Legend
- Posts: 3010
- Joined: Sun Sep 09, 2007 10:42 pm
- Location: Whiteabbey, Co Antrim
- MMOC Member: Yes
Re: 1949 Tourer from Aus
My MM has the beading fitted on the front wings, though its a slightly smaller profile than the stuff used on the back wings
Too many Minors so little time.....
-
- Minor Legend
- Posts: 2646
- Joined: Thu May 11, 2006 10:34 am
- Location: Cardiff
- MMOC Member: Yes
Re: 1949 Tourer from Aus
Thanks, David. Does it go all the way to the doors or stop at the end of the bonnet?
Cardiff, UK
-
- Minor Legend
- Posts: 2646
- Joined: Thu May 11, 2006 10:34 am
- Location: Cardiff
- MMOC Member: Yes
Re: 1949 Tourer from Aus
Guide coat applied but it started to run a bit. Serves me right for spraying without the light on.
Off to Egypt for the day on Thursday so not much chance for any more progress this week.[frame][/frame]I learnt a little trick from a TV show. They skimmed the panels right over the gap and then ran a lolloypop stick down it to clear out the excess filler and leave a nice parallel line. Seems to have worked well.
Cardiff, UK
-
- Minor Legend
- Posts: 3010
- Joined: Sun Sep 09, 2007 10:42 pm
- Location: Whiteabbey, Co Antrim
- MMOC Member: Yes
Re: 1949 Tourer from Aus
Yes fitted right back to the doors, heres a not too great pic. If you need a better one let me know as I will have the MM out this weekend.[frame][/frame]
Too many Minors so little time.....
-
- Minor Legend
- Posts: 2646
- Joined: Thu May 11, 2006 10:34 am
- Location: Cardiff
- MMOC Member: Yes
Re: 1949 Tourer from Aus
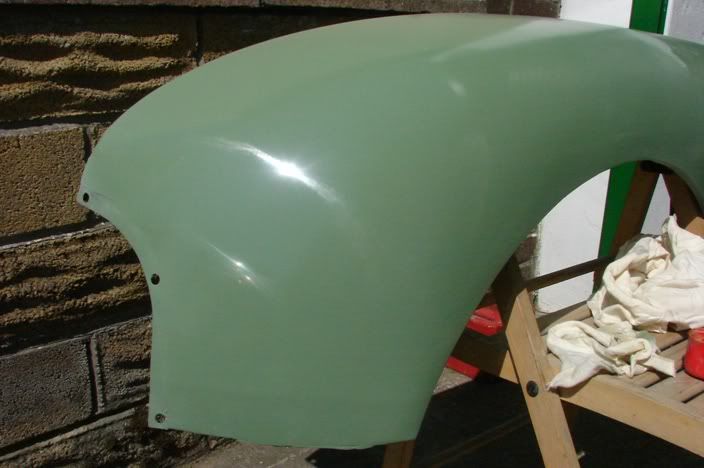
One wing flattened and a first coat on. A bit of T-cut to see how the final colour will look. I had a chocolate biscuit with the last cup of tea so I guess the colour is alright with the management.
Cardiff, UK
-
- Minor Legend
- Posts: 4064
- Joined: Tue Dec 07, 2004 8:50 am
- Location: Margate, East Kent
- MMOC Member: No
Re: 1949 Tourer from Aus
Guide coat does not need to be as heavy as this- just a dusting is plenty!RobThomas wrote:Guide coat applied but it started to run a bit. Serves me right for spraying without the light on.
Off to Egypt for the day on Thursday so not much chance for any more progress this week.[frame][/frame]I learnt a little trick from a TV show. They skimmed the panels right over the gap and then ran a lolloypop stick down it to clear out the excess filler and leave a nice parallel line. Seems to have worked well.
Panel fit looks great, though. Good job!
Last edited by chickenjohn on Sun May 08, 2011 5:49 pm, edited 1 time in total.
Cheers John - all comments IMHO
- Come to this years Kent branches Hop rally! http://www.kenthop.co.uk
(check out the East Kent branch website http://www.ekmm.co.uk )
- Come to this years Kent branches Hop rally! http://www.kenthop.co.uk
(check out the East Kent branch website http://www.ekmm.co.uk )