Pickup tidy up

Let us all know what you are up to with your current restoration project. Get that Minor on the road!
Forum rules
By using this site, you agree to our rules. Please see: Terms of Use
JSimons
Minor Friendly
Posts: 63
Joined: Wed Mar 30, 2011 12:12 am
Location: Bournemouth
MMOC Member: No

Pickup tidy up

Post by JSimons »

Hi all

I have always wanted to write a restoration thread, and feel like better now than never :)

My dad and I own a 1953 Convertible and we have recently inherited a 1960 pickup. My task, over the next *cough* two weeks *cough* (before i head off to uni) is to overhaul the front end of the pickup and give it an overall tidy up.

A bit of background, the pickup was originally purchased in 1993 and then over a period of around 6 months it was completely restored and driven to shows and went on runs over the next 15 years. The main downfall however was that it was always kept outside and therefore was subject to the elements. It has taken it's toll on the old girl and so the time has come to once again give it some TLC.

First 'job' which i carried out was to remove the tilt off the back, personal preference really but i prefer the tonneau cover. Whilst i was there the back got a good sweep and tidy, was full of odds and sods.

The next task, which was desperately needed was to give the entirety of the paintwork a good mop over and clean.

Some before shots:

Image
Image
Image

Then after much elbow grease (aka holding the polisher), the paintwork came up better than i expected. It is still rough at the edges, mainly due to rust and what not, but a vast improvement

Image

In an odd order of events, the engine bay detailing was next on the menu. At some point the front grill took a knock and will therefore be subject to some panel beating and straightening at some point. Also the chrome strip which runs along the top of it is in a seriously bad state, and so will either be replaced or re-chromed, any suggestions?

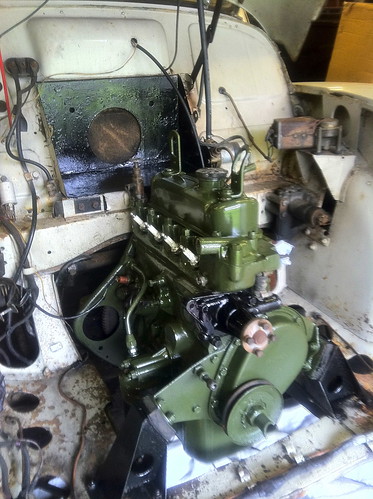
This is what i'm starting with:
Image

So with the radiator drained, and removed, after some serious wrestling with the hoses, i tackled removing the bumper and front end. To no suprise all the bolts which held the grill in place were extremely rusty, but with the aid of some WD40 they eventually gave up the fight. The exposed panels were a bit worse than i initially thought and so will need some extra attention.

I discovered also that the engine mounts were badly perished, and with such easy access they will be next to be changed.

Image
Image

Im currently struggling with the choke cable, no matter what i try i cannot get the retaining bolt to give it up and so it is currently preventing me from removing the carb and manifolds for cleaning.

That’s all so far, although the front bumper blade has been repainted and the rear spring structure, if thats how one can describe it, that sits inside the bumper has also been given the hammerite treatment. Also, one night when i had some spare time, i decided to save some money by ‘restoring’ the pressed number plates with a can of aerosol and the trusty work of a wire wheel. Quite pleased with the result and saved me a few bob in the process.

List from here on in:

Completely degrease and wire brush the entirety of the engine bay
Give everything a good lick of paint
Straighten the grill and front bumper
Then take her out for a well earned run

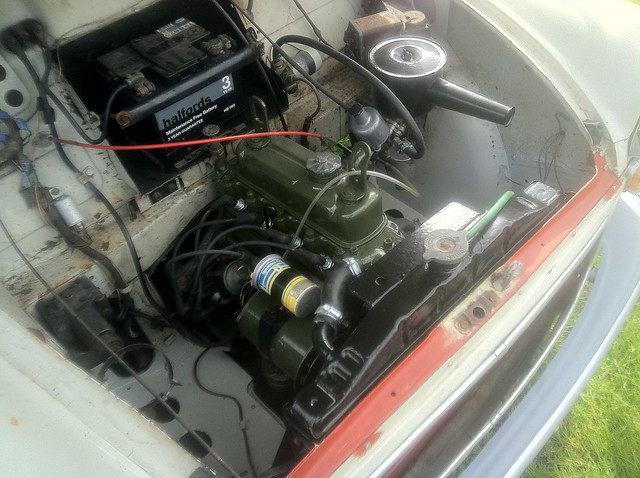
Im hoping to achieve a similar result to which i achieved on my other mog, it took me about three days in total and although the engine bay paint still needs some attention, overall it was a vast improvement and almost tempts me to open up the bonnet at shows :)

Image

Regards

Joe
Image
Jared
Minor Friendly
Posts: 58
Joined: Sat Jun 12, 2010 4:39 pm
Location: Staffordshire
MMOC Member: No

Re: Pickup tidy up

Post by Jared »

Looks like a good start, keep us updated. :D
JSimons
Minor Friendly
Posts: 63
Joined: Wed Mar 30, 2011 12:12 am
Location: Bournemouth
MMOC Member: No

Re: Pickup tidy up

Post by JSimons »

Hi all again,

Little update, I have been tackling the little things in the garage. It always seems that the little jobs take the most time. I’ve just fully degreased the engine bay, and although the paintwork is rather unpleasant it looks much better just for removing the 15 years of crud and oil.

So the current state of the engine bay, after fighting with the choke cable and finally removing the manifolds and a degrease session:

Image

Have finished painting the various brackets from the engine bay, the water pump pully, the fan blade and the air filter:

Image

And finally, i’ve cleaned and painted the dynamo, very pleased with the result. Almost looks new

Image
Next on the menu; removing the starter motor and cleaning it, wire brush the bottom of the engine bay and give it a lick of paint and then comes the block. Should be fun

Regards

Joe
Image
Fingolfin
Minor Legend
Posts: 1312
Joined: Thu Jan 28, 2010 4:14 am
Location: Fulton, Missouri, United States
MMOC Member: No

Re: Pickup tidy up

Post by Fingolfin »

That looks very smart! I may be painting Mog's engine soon, so I'll be watching this closely for ideas. :wink: Good luck! No doubt it won't be too hard.
The way to a man's heart may be making food, but the way to my heart is buying me car parts!
Come read about my Minor at An American Moggie.

JSimons
Minor Friendly
Posts: 63
Joined: Wed Mar 30, 2011 12:12 am
Location: Bournemouth
MMOC Member: No

Re: Pickup tidy up

Post by JSimons »

Quite a lot of progress has been made since the last update. Starting with the painting of the radiator. Hammerite is good stuff, though difficult to achieve a good finish with. I tend to apply it quite thickly and it seems to prevent the brush marks from being too prominent. Also cleaned up the radiator cap while i was there.

Does anyone know where i could get a stencil for the ‘turn cap slowly to avoid scolding’ or something along those lines to spray onto the rad?

Image

Next i started on the manifolds. Was undecided as to whether i sprayed the inlet manifold or simply cleaned it, but decided upon the painted finish in the end as i couldn’t get the finish i desired simply by cleaning it. The exhaust manifold also got sprayed using a heat resistant paint specifically designed for the chimney’s on traction engines, so hopefully it won’t crack up. The carb then got a good polish with a toothbrush and autoglym metal polish. Came up well in the end.

Before:

Image

After:

Image

Then the block received it’s first coat of paint. Looks so much better. Got the paint from bull motif and it seems to cover really well, so far have painted my other engine with three coats and put a single coat on this block and have only used a third of the litre tin. Well worth the money. While i was there the battery tray and the engine mount towers were also painted.

Image

Finally I cleaned and painted the starter motor, that’s pretty much the last engine component that needed some treatment.

Image

I’ve now hit a bit of a snag. I covered the engine in prep for painting the engine bay floor, and moved the brake pipes and wiring out of the the way but...

Underneath one of the engine mount towers i’ve discovered a large amount of rust causing the engine bay floor to be pushed up and also after closer inspection and clean with the wire wheel some holes have emerged:

Image

Image

Not really sure what to do at this point, may have to call in a mobile welder as i have none of the equipment and the only transport option would be on a trailer.

Think this plate has seen better days:

Image

Regards
Image
JSimons
Minor Friendly
Posts: 63
Joined: Wed Mar 30, 2011 12:12 am
Location: Bournemouth
MMOC Member: No

Re: Pickup tidy up

Post by JSimons »

Another little update,

Have had the two areas of the engine bay welded and since i have painted it with red oxide and then the top coat. I masked off the engine and the exhaust but decided to not strictly mask the bay floor since i preferred the paint to get right into the corners and properly seal it off.

The paint itself is the right colour, but inevitably with weathering and oxidation to the surrounding paint it looks rather ‘fresh’ relative to the other paintwork.

After a coat of red oxide:

Image

Then a little ‘before’ shot:

Image

Then after the top coat:

Image

I have also prepared the front grill for a top coat, I couldn’t get the grill surround off though as the nuts seemed to just turn and weren’t actually undoing. Was quite rusty, but after a good grind back and a quick wet & dry:

Image

The rear panel was in a worse state, will take quite a bit of work to get it ready to be put back on. Will want to put the engine back together first though since the garage is getting rather full with random bolts and parts all over the place, so probably best to get them out of the way first.

Did have a chance to give it a rough clean with the grinder and a degrease, though will need disassembling to finish the job:

Image

Have also had the bumper valance straightened and the grill slats, though one of the brackets snapped whilst being manipulated and so will need to be welded back on before being painted.

Regards

Joe
Image
DaisyMayFozz
Minor Fan
Posts: 492
Joined: Tue Jun 02, 2009 7:44 pm
Location: East Yorkshire
MMOC Member: No

Re: Pickup tidy up

Post by DaisyMayFozz »

Looks Excellent Joe, wish my engine bay was like that.

LouiseM
Moderator
Moderator
Posts: 4417
Joined: Sat Jan 08, 2005 5:11 pm
Location: London
MMOC Member: No

Re: Pickup tidy up

Post by LouiseM »

JSimons wrote:Does anyone know where i could get a stencil for the ‘turn cap slowly to avoid scolding’ or something along those lines to spray onto the rad?
Bull Motif sell them. Described as 'open radiator slowly' template sticker part: DEC114


Eric - 1971 Traveller
JSimons
Minor Friendly
Posts: 63
Joined: Wed Mar 30, 2011 12:12 am
Location: Bournemouth
MMOC Member: No

Re: Pickup tidy up

Post by JSimons »

Progress as of last night:

Image

Managed to put all of the engine back together, drilled the holes for the engine mount and brake t-piece and re-route and re-connect the wiring. Did attempt to start it but one of the wires feeding the coils decided to snap and by the time i’d fixed it, it was getting late.

Today though i attached the exhaust and so was able to connect the throttle spring and then also the advance/retard pipe. The engine did fire up, but the timing was miles out and i could only run it for a few seconds without the radiator attached.

I’ve also fully prepared the front slatted part of the grill and the rust treatment is doing it’s magic

So only things left to do:

Red oxide the front grill, to seal it off ready for spraying when the rest of the car is done
Finish grinding back the rear grill section and paint it
Re-assemble cooling system
Re-assemble front bumper and place on car

Fingers crossed i can complete it by friday.

Regards
Image
JSimons
Minor Friendly
Posts: 63
Joined: Wed Mar 30, 2011 12:12 am
Location: Bournemouth
MMOC Member: No

Re: Pickup tidy up

Post by JSimons »

Final update, for a while atleast

I have just put in my last stint in the garage before heading off to uni. She is, im glad to say, back in one piece.

Initially I ground back the panel which sits behind the front grill, which the radiator attaches too. The engine side of this panel was painted with hammerite, and the grill sound was painted in red oxide, ready for the top coat when the car is sprayed.

I then reassembled the grill assembly, excluding the slats as they are still in primer, waiting on paint. I did however piece it together using nuts and bolts, rather than using the chrome strip since this is a new unit and it saves it getting damaged when the car has to come apart again.

The bumper was then also reassembled, again with the valance in primer.

Finally, with the grill and bumper reattached the radiator was placed back in, and the coolant system filled.

Im very happy with the finish on the engine itself, obviously the surrounding bodywork needs some imagination, but the finish in primer is smooth and the rust is gone. Hopefully it will be transformed when the final coat goes on.

Some pics of the current state of play:

Image
Image
Image

Annoyingly the engine isn’t actually running well at all now that its all back together. I believe it to be due to a leak somewhere on the inlet side. Though this will have to wait now, unless i can sort it out tomorrow.

Until later

Regards

Joe
Image
JSimons
Minor Friendly
Posts: 63
Joined: Wed Mar 30, 2011 12:12 am
Location: Bournemouth
MMOC Member: No

Re: Pickup tidy up

Post by JSimons »

Got it working, my error.

The throttle cable had been placed on too tight and so the carb was revving high. It was dropping out when cold which led to the inlet leak assumption

All fixed now though. Hopefully going to take her round the block tomorrow.

Regards
Image
JSimons
Minor Friendly
Posts: 63
Joined: Wed Mar 30, 2011 12:12 am
Location: Bournemouth
MMOC Member: No

Re: Pickup tidy up

Post by JSimons »

Well came home from uni for a weekend of tinkering on the cars.

Have just sprayed the internal grill for the pickup and attached the slatted part. Was a complete nightmare as nothing wanted to line up on re-assembly. The hockey sticks especially!

Anyways, a few pics..

Image

Image

Then got a bit arty farty with the camera :)

Image

Image

As you can see, i took my other mog out the garage for the first time in two months. Got in, turned the key, and she fired straight up. She does need a new rocker cover gasket as oil has leaked down one side of the freshly painted engine :(. That'll be ordered and done over xmas.

Hope everyone is well

Regards

Joe
Image
RussLCV
Minor Legend
Posts: 1036
Joined: Tue Mar 19, 2002 12:00 am
Location: Cardiff WALES
MMOC Member: No

Re: Pickup tidy up

Post by RussLCV »

Nice one jo, looking good
Russell Harvey
Minor LCV Register Historian
Freelance Motoring Journalist
http://www.Minorlcvreg.co.uk

JSimons
Minor Friendly
Posts: 63
Joined: Wed Mar 30, 2011 12:12 am
Location: Bournemouth
MMOC Member: No

Re: Pickup tidy up

Post by JSimons »

Well we finally bit the bullet and are having the pickup sprayed.

It has been happening over the last three weeks, complete strip down, back to metal, etc

I am soo happy with the result so far, it feels really good to give the old girl a new lease of life.

Hopefully picking her up some time next week.

Does anyone have any idea what colour the interior should be? Currently it's a sort of 'autumn leaf' but i've heard that they should be black?

Here are the pics. Hope you like them[frame]Image[/frame]
Image
JSimons
Minor Friendly
Posts: 63
Joined: Wed Mar 30, 2011 12:12 am
Location: Bournemouth
MMOC Member: No

Re: Pickup tidy up

Post by JSimons »

[frame]Image[/frame]
Image
JSimons
Minor Friendly
Posts: 63
Joined: Wed Mar 30, 2011 12:12 am
Location: Bournemouth
MMOC Member: No

Re: Pickup tidy up

Post by JSimons »

[frame]Image[/frame]
Image
JSimons
Minor Friendly
Posts: 63
Joined: Wed Mar 30, 2011 12:12 am
Location: Bournemouth
MMOC Member: No

Re: Pickup tidy up

Post by JSimons »

[frame]Image[/frame]
Image
JSimons
Minor Friendly
Posts: 63
Joined: Wed Mar 30, 2011 12:12 am
Location: Bournemouth
MMOC Member: No

Re: Pickup tidy up

Post by JSimons »

[frame]Image[/frame]
Image
JSimons
Minor Friendly
Posts: 63
Joined: Wed Mar 30, 2011 12:12 am
Location: Bournemouth
MMOC Member: No

Re: Pickup tidy up

Post by JSimons »

[frame]Image[/frame]
Image
JSimons
Minor Friendly
Posts: 63
Joined: Wed Mar 30, 2011 12:12 am
Location: Bournemouth
MMOC Member: No

Re: Pickup tidy up

Post by JSimons »

[frame]Image[/frame]
Image
Post Reply