Page 1 of 1
Florrie
Posted: Sun Jul 08, 2018 4:57 pm
by culp

- IMG_0658.jpg (259.89 KiB) Viewed 5475 times
Here is Florrie.
She's a 1970 Traveller in Almond Green. She's been a daily driver until recently when the clutch started acting up. In taking off the gearbox cover to investigate I discovered rust in the Chassis Leg.

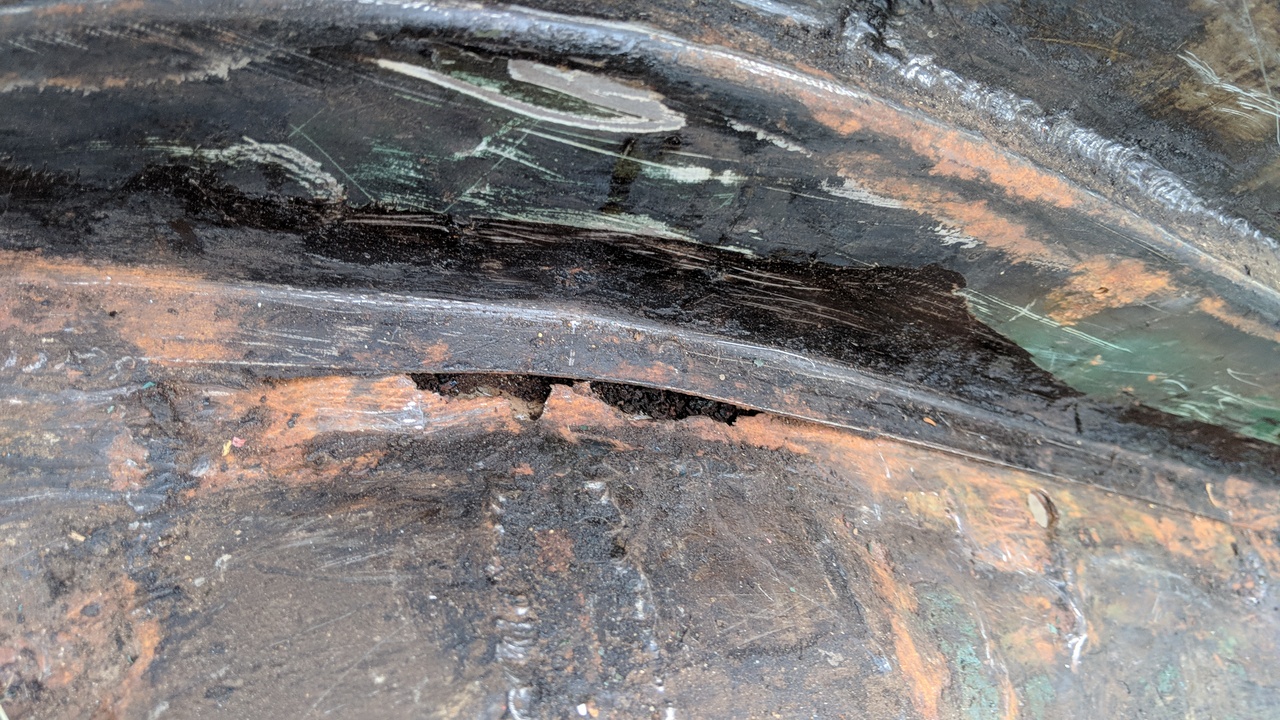
- daylight and bathroom filler showing
- MVIMG_20180630_183652.jpg (259.19 KiB) Viewed 5475 times
So I thought I should take the engine out...and there discovered rust in the front inner wing and flitch

- the bumper iron wobbles
- MVIMG_20180708_115907.jpg (301.33 KiB) Viewed 5475 times
Which meant I took the wing off and found rust in the hinge pillar and cover panel

- MVIMG_20180705_122410.jpg (207.81 KiB) Viewed 5475 times
Which meant I took the sill Kick Plate off and found a horribly botched up mess

- IMG_20180708_115832 (1).jpg (189.93 KiB) Viewed 5475 times
Re: Florrie
Posted: Sun Jul 08, 2018 6:51 pm
by firedrake1942
But at least you have still got the NMP plate by the looks of it!
Re: Florrie
Posted: Sat Jul 14, 2018 4:09 pm
by culp
firedrake1942 wrote: ↑Sun Jul 08, 2018 6:51 pm
But at least you have still got the NMP plate by the looks of it!
Yes it is still there. I guess I take it off and then replace it once I've cut out and replaced the tie plate?
Is it just a "nice to have original feature" or is there more to it than that?
Re: Florrie
Posted: Sat Jul 14, 2018 6:07 pm
by firedrake1942
Nope that's about it really, the relevance of the numbers, although thanks to POmMREG, (Respect Chris, you have been a huge help) , I can decipher them, is long gone with the paperwork at NMP /BMC etc. Gayden have nothing !
Re: Florrie
Posted: Tue Aug 14, 2018 6:25 pm
by culp
I have the body mostly stripped down now.

- IMG_20180814_175641.jpg (478.8 KiB) Viewed 5286 times
The tent is good although it flaps a bit in the wind. £179 off ebay.....bargain, although a friend pointed out that from the outside it looks like a crime scene

I have had numerous plans but at the moment plan D (don't ask about plans A-C) is to start with the rear wing.

- IMG_20180814_175701.jpg (569.04 KiB) Viewed 5286 times
There's certainly no doubt it needs replacing, bits of it were held on with bathroom filler.

- 20180814_155205.jpg (323.84 KiB) Viewed 5286 times
I was in the process of cleaning up the cut lines so as to not mess up my angle grinder cutting wheel too much when i discovered under a pile of underseal, this (you're looking down on the lhs were the rear inner sill meets the floor)
- IMG_20180814_175724.jpg (523.45 KiB) Viewed 5286 times
My aim is to do a 'proper job' so even though I'm a beginner at bodywork I'm going to have a go at hand making a repair piece and then cutting out the damage and butt welding it in

Also this

- Morris Minor Traveller Boot floor rear LHS
- IMG_20180814_175739.jpg (488.43 KiB) Viewed 5286 times
I'm thinking I may need to replace the whole of the boot floor with
http://www.morrisminorspares.com/body-i ... de-p828537
Re: Florrie
Posted: Tue Aug 14, 2018 7:09 pm
by ManyMinors
What a horrible mess

Good for you in trying to save it. It can all be done and thankfully most repair panels can be purchased. That boot floor seems a good beginning for your shopping list........ Good luck with it.
Re: Florrie
Posted: Tue Aug 14, 2018 9:51 pm
by SteveClem
Nice looking Landy in the background. You'll have something fun to drive while you're sorting her out!
Re: Florrie
Posted: Thu Aug 16, 2018 8:43 am
by Redmoggy
Lots of posts on here about bracing the shell and taking lots of measurements, it's good advise and will give you some valuable welding practise!
However, before bracing the body how do the doors fit in their apertures and what condition are the hinges in? The final fit of the doors will depend on your bracing and measuring skills and if they don't fit now due to corrosion and or poor repairs you may just find they don't fit when your done.
Please do not just jump straight in with a cheap and nasty gas less MIG and assume your a welder. Invest in some decent gear and take some time to practise on some nice new 18 gauge steel.
Rod
Re: Florrie
Posted: Mon Sep 03, 2018 6:49 pm
by culp
Redmoggy wrote: ↑Thu Aug 16, 2018 8:43 am
Lots of posts on here about bracing the shell and taking lots of measurements, it's good advise and will give you some valuable welding practise!
However, before bracing the body how do the doors fit in their apertures and what condition are the hinges in? The final fit of the doors will depend on your bracing and measuring skills and if they don't fit now due to corrosion and or poor repairs you may just find they don't fit when your done.
Please do not just jump straight in with a cheap and nasty gas less MIG and assume your a welder. Invest in some decent gear and take some time to practise on some nice new 18 gauge steel.
Rod
Thanks for the input Rod.
Door fit - dreadful! When I took the doors off there were botched up shims under both hinges. Passenger side better than the driver's side where the bad fit of the sill rail finishers was an early warning sign of trouble.
Mig welder - Sealey supermig 140, I've tried some test welds on 1.2mm steel and gotten some reasonably tidy results. I've done a bit of welding on heavy steel, and I'm adjusting now for the thinner steel.
The plan is to start with the rear-front spring hanger I have it on it's side now, pictures to follow
Re: Florrie
Posted: Mon Sep 03, 2018 7:01 pm
by culp
The game plan is to start with the rear-front spring hanger.

- IMG_20180821_151251.jpg (586.54 KiB) Viewed 5083 times
There's been a lot of plating around the hanger in various places including the floor edge panel which has been done properly...shame about the rest of it. I'm going to mark up distances from the holes onto the remaining floor panel then I'm planning to cut off the spring hanger. From there I shall mark the extent of the plate that comes with the repair panel

- spring-hanger-front-on-plate-l-h-lmc-hadrian-uk-made-p828463-4279_zoom.jpg (50.04 KiB) Viewed 5083 times
Cut the floor pan accordingly and weld in.
I'd like to do a butt weld...do you think that's absurdly optimistic for a beginner?
Re: Florrie
Posted: Mon Sep 03, 2018 7:48 pm
by Steve_k
I thought I had my work cut out with my car, if it was like yours I think I would run and hide. Great to see what is savable by someone with the determination and knowledge, I will be following your progress.

Re: Florrie
Posted: Tue Sep 04, 2018 10:01 am
by mogbob
Optimistic ? Probably not if you take time and care over it.
The more joins there are the greater the risk of getting it wrong. Like all things , with practice , the easier it becomes.
Try and get the repair section ( spring hanger ) upstand , where it joins the wheel arch ,fitting as best you can. This is holding it up against the car. The move to the "flat surfaces" of the repair section. Cut the basic size " over size " so that it is easier to see whether you are heading in the right direction. It always easier to cut more away than having to weld "extra " back in because you got carried away.
Another useful tip. In addition to measuring the exact distance between front and back central bolt holes for
the springs make up a simple jig. A wooden batten , two holes drilled to accommodate the bolts. Fix the front one to the empty bracket ( fixed position ) and the back one to the repair panel. You can then offer it up for marking your cut lines.
Putting a metal bar of copper behind your butt joint will act as a heat sink and allow you to weld and fill any small gaps at the same time. Clamp everything down well or prop up with a batten ( generally improvise so nothing moves ).
Good luck with it.
Bob
Re: Florrie
Posted: Tue Sep 04, 2018 11:08 am
by Redmoggy
As Bob said, care and attention. Avoid using abrasive discs to clean the metal for welding, it's going to be thin enough as it is! Look for 3M clean and strip discs, these remove rust without grinding the surface. For MIG welding your butt welds will require a gap of about 1 mm to compensate for the filler wire. Make a tack every 20 mm or so each time checking the panels remain level, a hammer and dolly can be useful for this. Once tacked in place you can start joining the tacks together but skip around and take your time. Start your weld on the new panel and let it flow into the old to avoid blowing holes. Personally I am a big fan of pulse welding, strike an arc on the new panel and as your weld pool builds draw a small circle with the torch to flow the weld pool into the old steel then stop. Just as the weld cools move the torch and repeat overlapping the first weld. The split second you wait between welds will all but eliminate the chance of blowing holes and because your concentrating on each individual weld you can ensure each one penetrates perfectly. The end result is also much flatter and easier to finish than it would be if you tried to rush the weld in one go. Do not be afraid to use some amps, remember you still need heat to weld and turning the welder all the way down will give poor results.
Rod
Re: Florrie
Posted: Wed Oct 31, 2018 9:56 am
by culp
A bit of progress.

- left hand inner wing progress
- inner wing progress.jpg (272.08 KiB) Viewed 4835 times
Things I have learnt.
1) check you have a cutting wheel on the angle grinder (not a grinding wheel) before starting to cut

2) cutting out to replace a panel you want to butt weld in needs to be UBER accurate,
UBER UBER accurate
3) cutting out takes 3x as long as I thought it would
4) repair panels aren't always the right solution
5) panel fabrication isn't as hard as I thought it would be
6) plug welding is harder than I thought it would be
Cutting out the old Inner wing was a ruddy nightmare. Somebody had welded a new inner wing,
inside the old rusty one with a weld that would have done justice to one of the legs on a North Sea Oil Rig. I was cutting 4 layers of metal in places. I did my best to grind off the weld but I was risking damaging the inner sill so I've had to leave it.

- 20180814_155227.jpg (207.07 KiB) Viewed 4835 times
Re: Florrie
Posted: Wed Oct 31, 2018 12:30 pm
by mogbob
Good man, well done. Experience is a great teacher. You've learnt a few things along the way, like we all had to
do in our time.
From your list , I know a few things " you ain't gonna do again ".
For replicating the spot welds / plug welding... a couple of points / hints / tips.
You can buy a " spot weld nozzle / gas shroud" for the MIG torch to replace the normal shroud , basically the cylinder shape has two short "legs " protruding. These keep the nozzle at 90 degrees to the work at the "correct distance " when pressed firmly against the metal join.
Another tip , increase the wire speed a bit ( practice on some scrap as to " how much " for your machine, they are all different ).
Whilst practicing , think Catherine Wheel. Hit the dead center of the punched hole to start and swirl the weld in a very tiny circle , working outwards to fill the hole , keeping the metal hot and molten , so that the whole circle is filled.
Once cooled , look carefully at the reverse side to check you have a perfect blue circle , indicating that penetration has got through , hence the heat indicator and you should have a good strong " spot " weld.
If you're struggling to see / detect the blue circle , you need to crank up the power and possibly the wire speed.
You can test the spot weld pratice piece to destruction.One piece of metal held in a vice and the second piece firmly in a mole wrench.If you can get it apart ... the weld was Rubbish. Practice some more. If the metal sheared before the spot weld broke... didn't you do well. Now do the same again.
I won't reveal/ confess how many practices I had to do ! Ha Ha, I'm good at it now though.
Bob
Re: Florrie
Posted: Wed Oct 31, 2018 2:06 pm
by culp
Thanks MogBob
Re: Florrie
Posted: Wed Oct 31, 2018 7:10 pm
by King Kenny
You are a brave man and I admire you. Well done.
Re: Florrie
Posted: Tue Nov 06, 2018 8:55 am
by Redmoggy
You need to turn up your wire speed to get some more amps into your weld, currently you are a little lacking in penetration (said the Nun to the Vicar).
Rod
Re: Florrie
Posted: Wed Nov 07, 2018 9:24 pm
by culp
Thanks! Will do.