I'm trying to fit a ford based disc brake kit at the moment.
Unfortunately I don't have any instructions apart from the minor monthly article from a couple of years ago.
There is a backing plate and 2 calliper brackets (one is flat and the other has a couple of rings welded to it). Can anyone tell me what order they go over the stub axel. I have 2 short bolts and 2 long bolts for fitting with 4 nyloc nuts. Looking at the magazine article it looks like I also need 2 ordinary nuts as well but I'm not sure where these go.
Any help would be gratefully received.
cheers,
Tom
ford disc brake kit...help please
Forum rules
By using this site, you agree to our rules. Please see: Terms of Use
By using this site, you agree to our rules. Please see: Terms of Use
-
Cam
- Moderator

- Posts: 5108
- Joined: Mon May 20, 2002 1:00 am
- Location: Stoke-on-Trent, Staffordshire, UK
- MMOC Member: No
There are different kits about. Which one is yours? (where did you get it from)? Also, if you can post some pictures of the parts it would help.
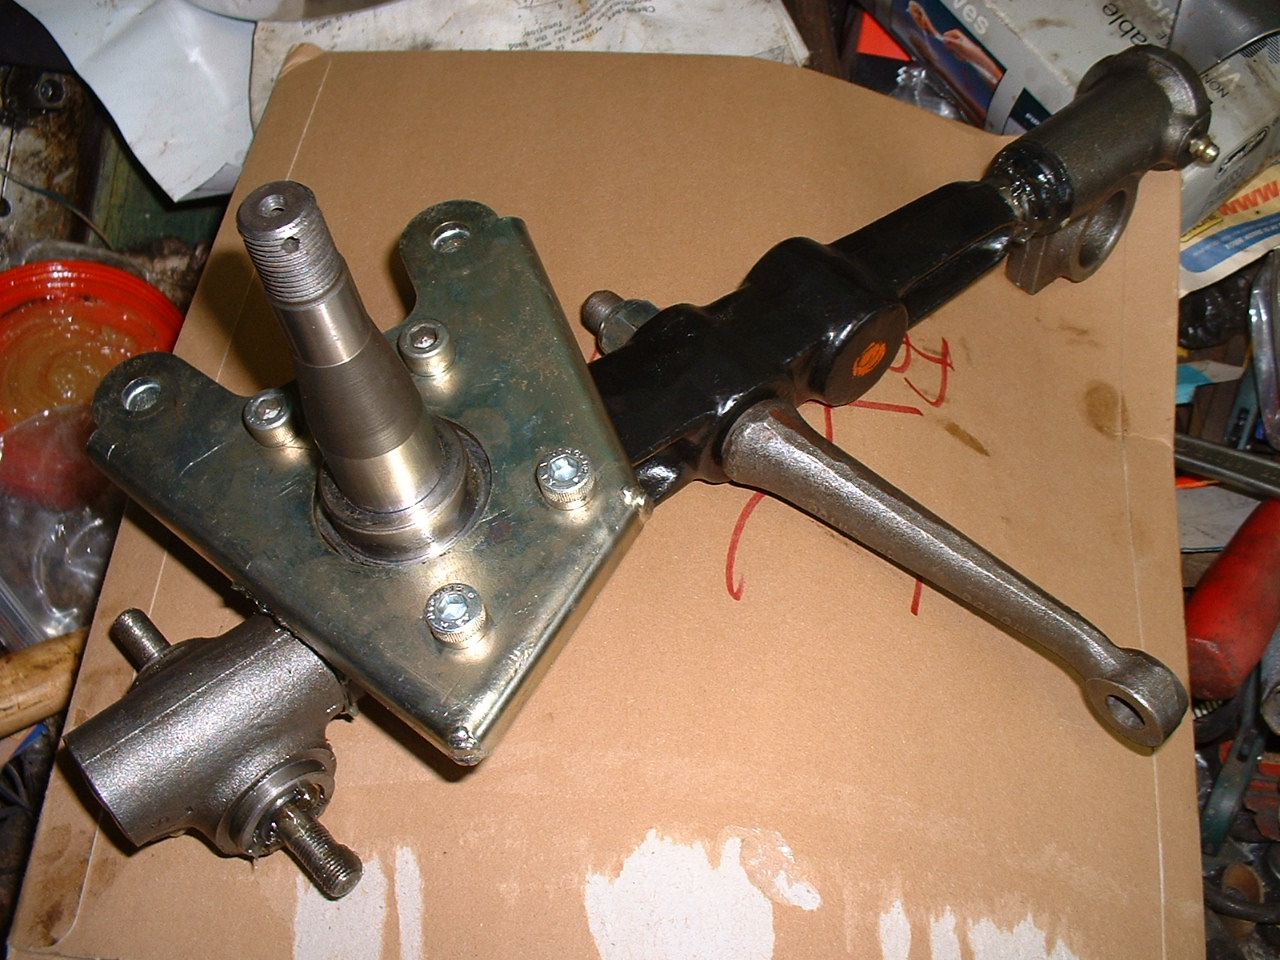
They can only really go on one way. Usually the flat calpier bracket goes on the other side of the stub axle (towards the centre of the car) and the one with stand offs (rings welded to it) goes on the opposite side. The backing plate goes on first though over the stub axle itself.
The idea is for the caliper brackets to sandwich the backing plate and the stub axle flange.
The 2 long bolts go through the caliper bracket (with the rings welded on) then the backing plate, then the stub axle flange then the two ordinary nuts are fitted, then the flat caliper bracket goes on, then finally the 2 nylocs.
The 2 short bolts just go through the caliper bracket with the rings welded on, then the backing plate, then the stub-axle flange then the nylocs are fitted.
If that does not make any sense then you must have a different set-up to me and pictures will help identify things.
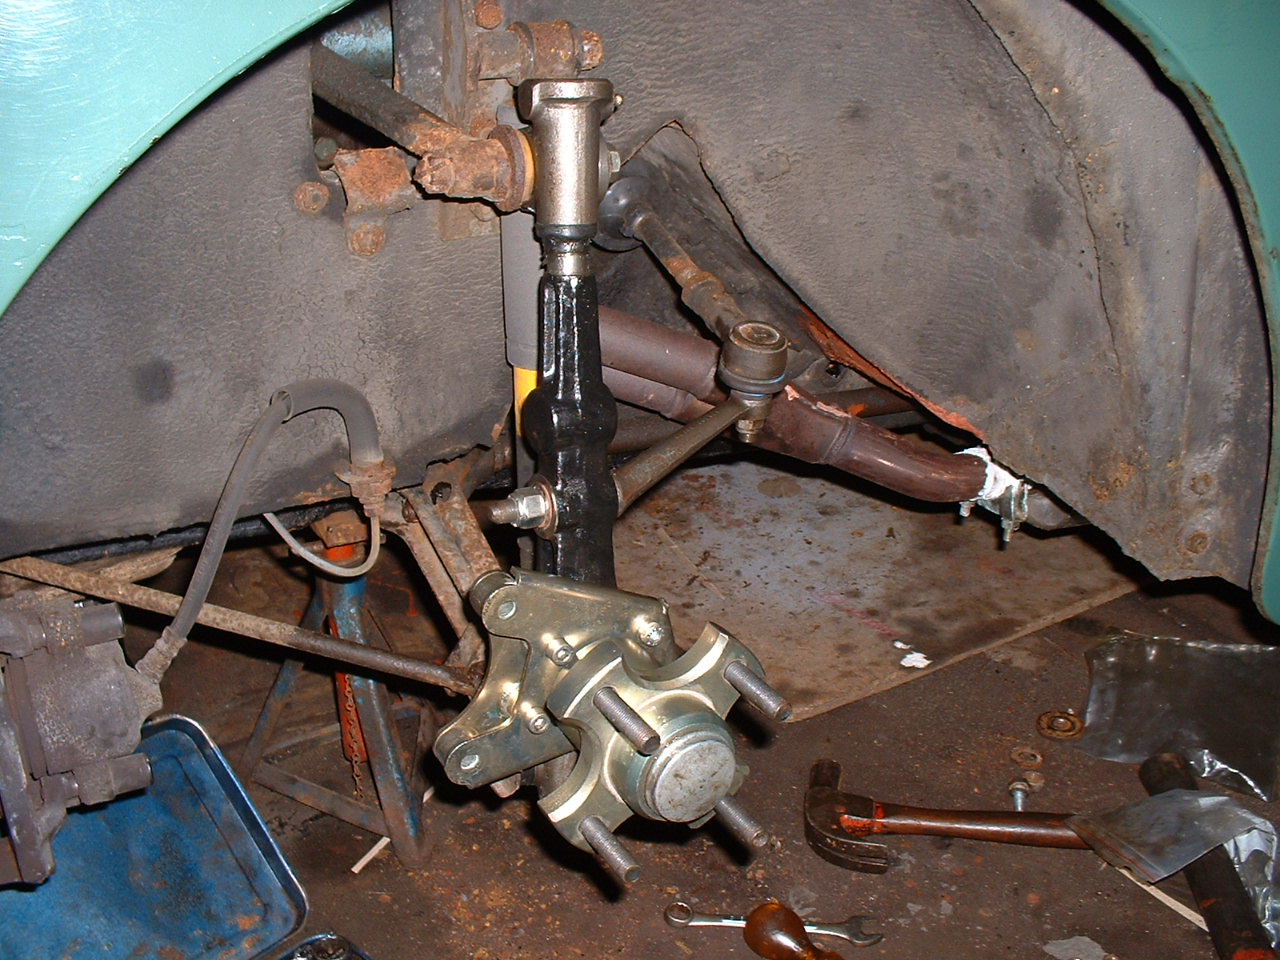
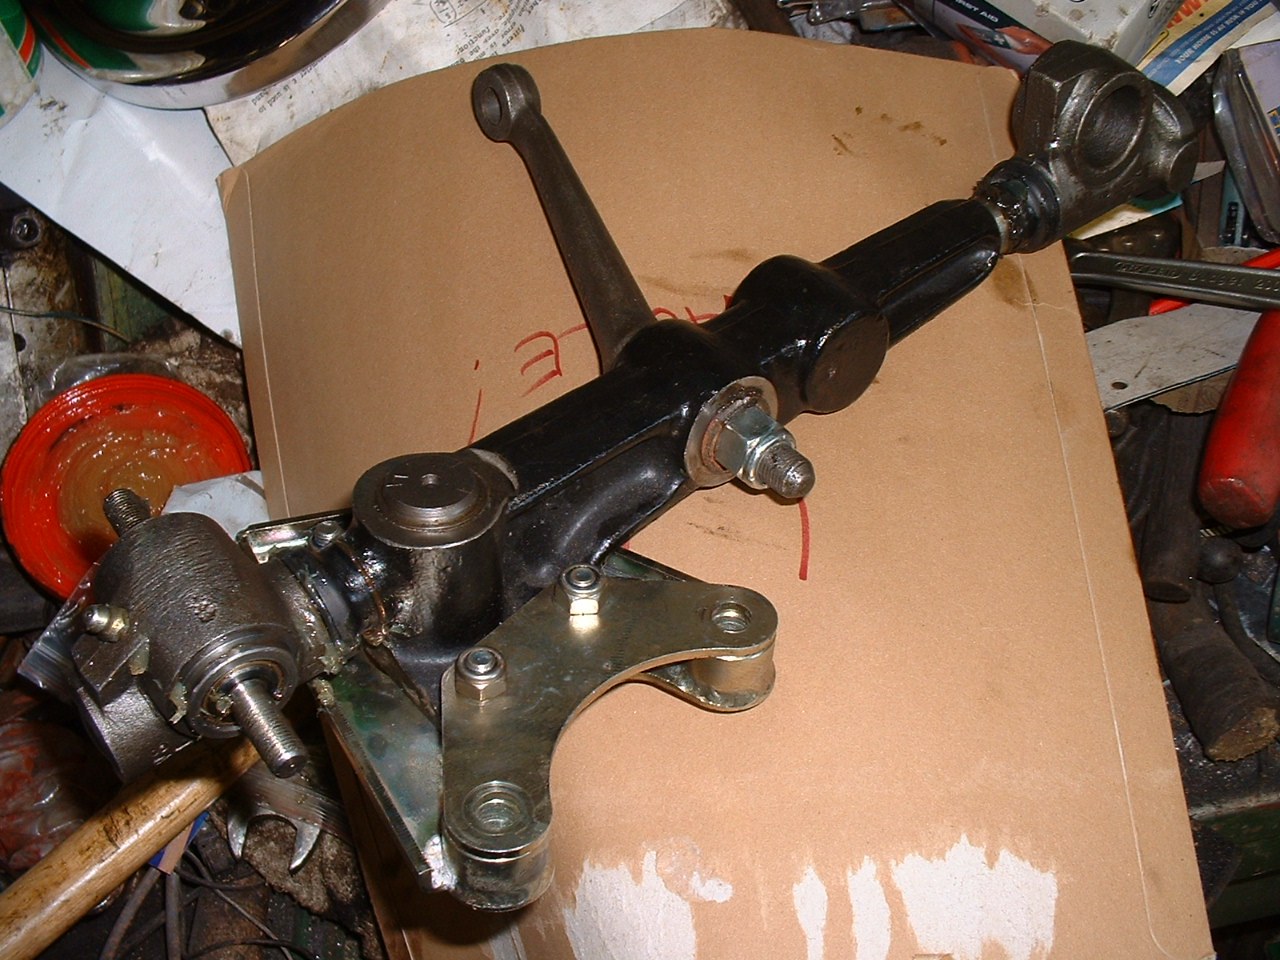
Have a look at these pictures and see if any of it makes sense:
http://potteries.mmoc.org.uk/Members_Ca ... _discs.JPG
This later kit (JLH) does not have any backing plates though:
http://potteries.mmoc.org.uk/Members_Ca ... 616_07.JPG
http://potteries.mmoc.org.uk/Members_Ca ... 616_09.JPG
http://potteries.mmoc.org.uk/Members_Ca ... 616_13.JPG
http://potteries.mmoc.org.uk/Members_Ca ... 616_10.JPG
They can only really go on one way. Usually the flat calpier bracket goes on the other side of the stub axle (towards the centre of the car) and the one with stand offs (rings welded to it) goes on the opposite side. The backing plate goes on first though over the stub axle itself.
The idea is for the caliper brackets to sandwich the backing plate and the stub axle flange.
The 2 long bolts go through the caliper bracket (with the rings welded on) then the backing plate, then the stub axle flange then the two ordinary nuts are fitted, then the flat caliper bracket goes on, then finally the 2 nylocs.
The 2 short bolts just go through the caliper bracket with the rings welded on, then the backing plate, then the stub-axle flange then the nylocs are fitted.
If that does not make any sense
Have a look at these pictures and see if any of it makes sense:
http://potteries.mmoc.org.uk/Members_Ca ... _discs.JPG
This later kit (JLH) does not have any backing plates though:
http://potteries.mmoc.org.uk/Members_Ca ... 616_07.JPG
http://potteries.mmoc.org.uk/Members_Ca ... 616_09.JPG
http://potteries.mmoc.org.uk/Members_Ca ... 616_13.JPG
http://potteries.mmoc.org.uk/Members_Ca ... 616_10.JPG
 Websites:
 -
Multiphonikks
- Minor Addict
- Posts: 720
- Joined: Mon May 24, 2004 12:32 pm
- Location: Bristol
- MMOC Member: No
Any photos Tom? If you could snap a few it may help diagnosing the problems 
<img src="http://www.aminorjourney.com/webcam.jpg" width="200">
[url=http://www.aminorjourney.co.uk/wordpress/]A Minor Journey[/url] A neogreen musician, her girlfriend and a cast of thousands!
Keep track of the restoration with the live webcam!
[url=http://www.aminorjourney.co.uk/wordpress/]A Minor Journey[/url] A neogreen musician, her girlfriend and a cast of thousands!
Keep track of the restoration with the live webcam!
Ford disc kit
Hi Tom,
Did you say that the kit is one of mine JLH, or Bath/ Owen burton's. Have you purchased the complete kit inc discs. The reason I mention this is that Baths kit is Sierra based and mine Escort. Did you need to drill out the holes on the stub axle facing plate to fit this caliper bracket, if you did then the kit is not mine. To align the caliper bracket you should fit all bolts including the two caliper bolts and tighten up evenly,when the 4 allen bolts are tight you should be able to remove the two caliper bolts easily, if not slacken off again until this is achieved.To remove any confusion you could let me know who you purchased the kit from as we keep exrensive records as to who has had what and when.
Jonathon
-
Cam
- Moderator
- Posts: 5108
- Joined: Mon May 20, 2002 1:00 am
- Location: Stoke-on-Trent, Staffordshire, UK
- MMOC Member: No
Tom, the Bath/Brum kit which I had on mine first was a pain and did not fit perfectly, but like Jonathon says, if you fit the caliper bolts first then tighten the rest it fits together better. Also I had to use some (supplied) packing washers to align the caliper to the disc correctly. This I was not 100% happy with doing but it seemed to work OK.
The JLH kit is much, much better. Goes on a treat as no messing about lining things up as the quality of manufacture is far superior. Also, no drilling of the mounting holes is needed AND the hubs are steel and not aluminium. I had no end of disc warping problems with my Bath/Brum kit and in the end I got exasperated with it and bought a JLH one which solved the problem!
Some people found the Bath/Brum kit fine and some didn't, so it seems to be pot luck!


remove both bearing races and try and slide them onto the stub axle independently. If you kingpins are new,i.e not original to the car, there is a slight bulging on the stub axle which does not allow the smaller outer bearing to seat correctly. If you do the test with the races and find this to be the problem, run a fine emmery cloth around the start of the main stub axle, where it meets the tapered ramp just beyond the threads. Only remove enough material and make sure you relieve material the full circumference.
Grease the stub axle replace the races and the rest of the assembly and tighten the stub nut to hand tight, finish full assembly of the disc kit and road wheel, adjust the stub nut until the play is taken up by the bearings, split pin the nut and check all fixings for security.
Grease the stub axle replace the races and the rest of the assembly and tighten the stub nut to hand tight, finish full assembly of the disc kit and road wheel, adjust the stub nut until the play is taken up by the bearings, split pin the nut and check all fixings for security.
thanks for all your help.
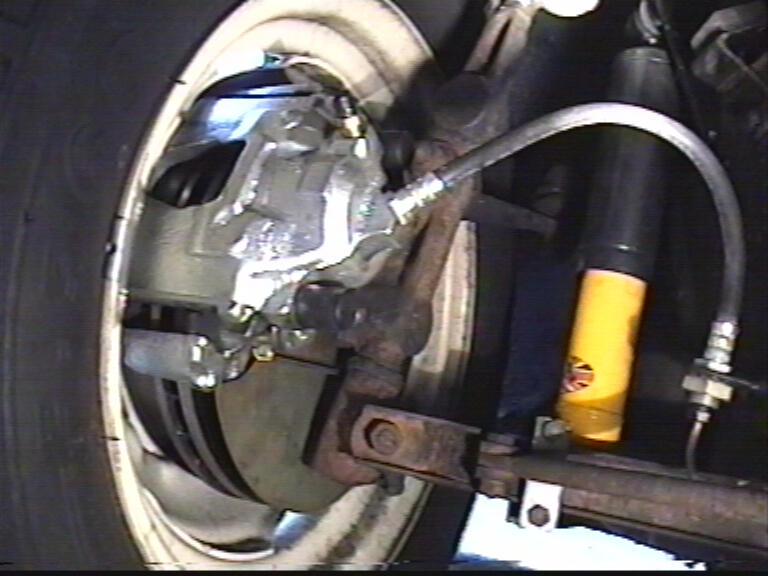
the hubs and calipers are on, the master cylinder is back in place with a remote brake fluid reservoir fitted.
I thought I would be ready to test the disc brakes this evening but I just can't seem to connect the new flexi brake hose on the near side to the nut on the existing copper brake pipe. The other side has gone on eventually. Do the nuts need to be a different size to fit into the flexihose on the ford conversion?
You should be cautious with the ridgid to flexi unions. Sometimes fine metric threaded unions are used, which look very similar to the original unf, they will also screw into a unf fitting but will feel a sloppy fit needless to say they will also leak fluid. We always use metric unions, and these are supplied in the kits. What was the problem with the bearing seating correctly?, how did you resolve the problem?